Rewired Editor
The Rewired Editor allows you to create players, actions, controller maps, custom controllers, configure settings, and more.
Pages:
- Settings
- Tools
- Players
- Actions
- Input Behaviors
- Map Categories
- Action Categories
- Custom Controllers
- Joystick Layouts
- Keyboard Layouts
- Mouse Layouts
- Custom Controller Layouts
- Joystick Maps
- Keyboard Maps
- Mouse Maps
- Custom Controller Maps
- Layout Manager Rules
- Map Enabler Rules
Settings
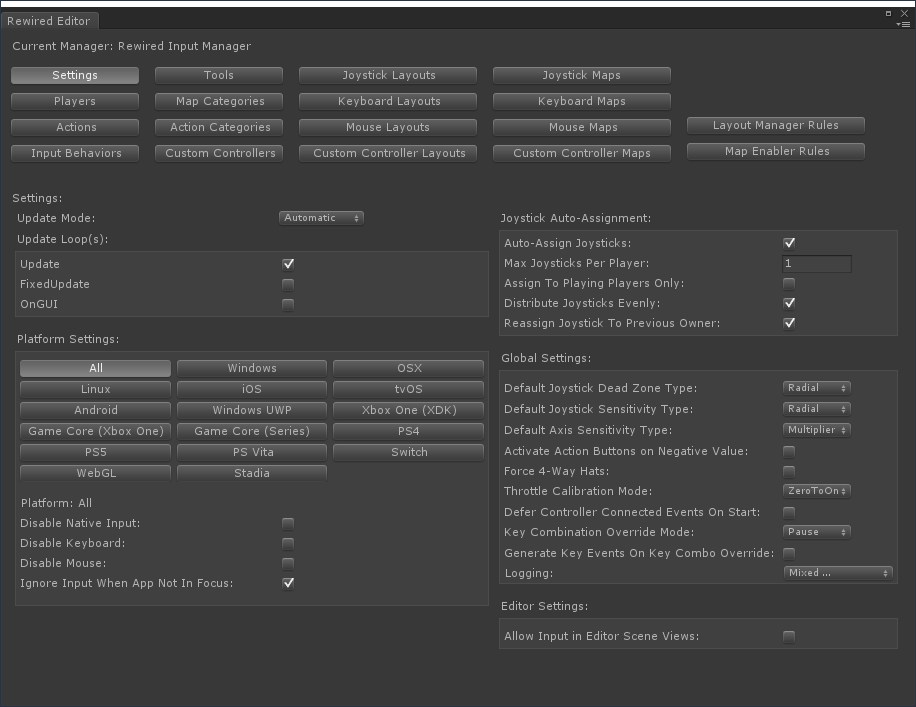
The Settings page allows you change the options for the current Input Manager. The options available are as follows:
| Update Mode | Automatic - Rewired updates automatically in the selected update loops. Manual - Update manually by calling ReInput.Update. All automatic updating will be disabled. |
| Update Loop: | Updates input in one or more game loops. |
| Update | Updates input in the Update loop. (Required) |
| FixedUpdate | Updates input in the FixedUpdate loop. If you try to get input from the FixedUpdate loop without enabling this, you will miss some input data. Ex: GetButtonDown and GetKeyDown will not always return correctly. |
| OnGUI | Updates input in the OnGUI loop. Only necessary if you need GetButtonDown to work within the Unity GUI. WARNING: Enabling this will cause a 300-500 byte memory allocation per frame due to the way OnGUI works. This will contribute to garbage collection overhead. |
| Platform Settings: | Certain build platforms have settings which you can set individually. Click the name of the platform, then options will appear below. For settings that affect all build platforms, click the "All" button. |
| All: | |
| Preferred Unity Input Source | For platforms that use native input, devices that are not supported by native input will fall back to Unity input. This mostly applies to keyboard, mouse, and touch input. However, if native input fails to initialize due to errors, this will also be used as the fallback input source for all devices. Each Unity input source has its own idiosyncrasies. Be aware of the differences. For example, the keyboard on Unity Input System, only supports "physical keys" (key codes returned for the pressed key based on US-101 key keyboard regardless of the keyboard layout.) Unity Input System supports getting keyboard key labels for international keyboards, so it supports localization better than Unity Input Manager. Unity Input Manager supports the option to enable or disable "physical keys". When it is enabled, however, it is impossible to get the actual key label for the key, and it will return incorrect values on keyboards other than US-101 key layout. UnityInputManager - Unity Input Manager (Legacy). UnityInputSystem - Unity Input System. (Unity 2021.2.0f1+) |
| Use Physical Keys | If enabled, keyboard keys will map to their physical location on a US 101-key keyboard regardless of the keyboard layout being used (AZERTY for example). This is useful for making a locale-independent input layout. Example: WASD to move. If enabled, the KeyCode returned for a key will match the US 101-key layout, and glyphs and help text will display incorrect information to the user unless Show System Key Labels is enabled and the underlying keyboard input source in use on the platform supports localized system key labels. For example, the A key on a AZERTY keyboard is located where the Q key is on a US 101-key keyboard, and the KeyCode returned for the A key will be KeyCode.Q. If Unity Input Manager is being used for keyboard input and Use Physical Keys is enabled, it is not possible to get the correct key label from Unity Input Manager for displaying glyphs and help text to the user if this option is enabled. If using Unity Input Manager for keyboard input, it is recommended to disable this option. See this for more information. If Unity Input System is being used for keyboard input and Use Physical Keys is disabled, it is not possible to display virtual (non-physical) keys. Enable Use Physical Keys to ensure consistency across build targets. |
| Show System Key Labels | If enabled, keyboard key labels will be displayed as reported by the system input API if available (including non-US layouts), instead of the built-in constant key labels based on the US keyboard layout. This currently affects any platform that uses Unity Input System for keyboard input and the Windows Standalone platform with Native Keyboard Handling enabled. System key labels cannot be displayed for Unity Input Manager. |
| Disable Native Input | Force Unity Input to be the input source. This will disable all external input sources such as Raw Input, Direct Input, XInput, native OSX, etc. It will also disable all special platform plugins. If native input is disabled, special features will be unavailable on all platforms. Some platforms require native input and input will not function at all with native input disabled. This option primarily exists for debugging purposes. This should never be enabled in production. |
| Disable Keyboard | Disable keyboard input on all platforms? Disabling this can improve performance slightly. |
| Disable Mouse | Disable mouse input on all platforms? Disabling this can improve performance slightly. |
| Ignore Input When App Not In Focus | Ignores input if the application is not in focus. This setting has no effect on some platforms. NOTE: Disabling this does not guarantee that input will be processed when the application is out of focus. Whether input is received by the application or not is dependent on A) the input device type B) the current platform C) the input source(s) being used. |
| Windows: | |
| Input Source | The primary input source for the Windows Standalone platform. Raw Input - Use Raw Input for the input source. Note: Raw Input carries significant advantages over Direct Input such as better Bluetooth controller support, support for more elements on certain controllers, better controller recognition, etc. Does not require any extra libraries. Windows Control Panel joystick calibration does not affect joystick axes. XInput - Use XInput for the input source. This will use XInput only. All non-XInput compatible controllers will be non-functional. To support both XInput and non-XInput controllers, use Raw Input or Direct Input instead and enable the Use XInput option. Supports XBox Controller 2-motor vibration, independent trigger values, but only supports 4 XInput-compatible controllers at once. Installation of DirectX end-user runtimes is required on Windows XP. Windows Gaming Input - Use Windows.Gaming.Input for the input source. This will use Windows.Gaming.Input only for controllers. All non-WindowsGamingInput compatible controllers will be non-functional. At the present time, only Gamepads are supported. To support all controller types, use Raw Input or Direct Input instead and enable the Use Windows Gaming Input option. Supports XBox Controller 4-motor vibration, independent trigger values, and supports more than 4 XInput-compatible controllers at once. (Requires Windows 10, October 2018 Update version 1809 (10.0.17763.0) or greater. Will fall back to other input sources on older versions of Windows.) Direct Input - Use Direct Input for the input source. Installation of DirectX end-user runtimes may be required for Direct Input support. Windows Control Panel joystick calibration settings affect joystick axes. SDL2 - Use SDL2 for the input source. This option requires the SDL2 runtime library to be installed. Note: SDL2 does not support as many devices as other native input sources. Unity Input Manager - Use Unity Input Manager (legacy). (Not recommended) Unity Input System - Use Unity Input System. (Not recommended) (Unity 2021.2.0f1+) |
| Use Windows Gaming Input | On Windows, use Windows.Gaming.Input for compatible devices. Devices not compatible with Windows Gaming Input will be handled by the primary input source. Supports XBox Controller 4-motor vibration, independent trigger values, and supports more than 4 XInput-compatible controllers at once. (Requires Windows 10, October 2018 Update version 1809 (10.0.17763.0) or greater. Will fall back to other input sources on older versions of Windows.) If both Use XInput and Use Windows Gaming Input are enabled, if Windows Gaming Input is unavalable on the system, XInput will be used as the fallback input source for compatible devices. Otherwise, the primary input source will be used as the fallback input source. (Only available when Input Source is set to Raw Input or Direct Input.) |
| Use XInput | On Windows, use XInput for compatible devices. Devices not compatible with XInput will be handled by the primary input source. Supports XBox Controller 2-motor vibration, independent trigger values, but only supports 4 XInput-compatible controllers at once. Installation of DirectX end-user runtimes is required on Windows XP. If both Use XInput and Use Windows Gaming Input are enabled, if Windows Gaming Input is unavalable on the system, XInput will be used as the fallback input source for compatible devices. Otherwise, the primary input source will be used as the fallback input source. (Only available when Input Source is set to Raw Input, Direct Input, or Windows Gaming Input.) |
| Joystick Refresh Rate | The joystick refresh rate in frames per second. Set this to a higher value if you need higher precision input timing at high frame rates such as for a music beat game. Higher values result in higher CPU usage. Note that setting this to a very high value when the game is running at a low frame rate will not result in higher precision input. This settings only applies to input sources that use a separate thread to poll for joystick input values (currently Direct Input, XInput, and Windows Gaming Input). This setting does not apply to event-based input sources such as Raw Input. |
| Native Mouse Handling | Use native libraries to handle the mouse. Enabling this will eliminate certain bugs associated with Unity's mouse handling. (Only available when Input Source is set to Raw Input or Direct Input.) |
| Native Keyboard Handling | Use native libraries to handle keyboard input. (Only available when Input Source is set to Raw Input or Direct Input.) |
| Enhanced Device Support | Enable low-level enhanced support for certain devices. If enhanced support is available for a particular device, this will enable device-specific features such as vibration / force feedback, lights, gyroscopes, accelerometers, touchpads, etc. (Only available when Input Source is set to Raw Input.) |
| Enhanced Device Support Options | Excluded Devices - A list of device types that will be excluded from Enhanced Device Support on this platform. A device that is excluded from Enhanced Device Support will treated like any other controller and will be handled by the primary and/or secondary input sources for the platform, and any special controller features provided by Enhanced Device Support will not be available. |
| Support XR Controllers (Unity Input System) | Uses Unity Input System to support XR controllers. XR controllers supported by Unity Input System will be handled using Unity Input System and all other controllers will be handled using the primary and secondary input sources. (Only available when Input Source is set to Raw Input or Direct Input.) (Unity 2021.2.0f1+) |
| OSX: | |
| Input Source | The primary input source for the OSX Standalone platform. Native - Use native input for the input source. This provides the best device support. Game Controller - Use Apple Game Controller framework for the input source. This provides support only for devices supported by the Game Controller framework. This may not include all devices supported by the Native input source. SDL2 - Use SDL2 for the input source. This option requires the SDL2 runtime library to be installed. Note: SDL2 does not support as many devices as other native input sources. Unity Input Manager - Use Unity Input Manager (legacy). (Not recommended) Unity Input System - Use Unity Input System. (Not recommended) (Unity 2021.2.0f1+) |
| Use Game Controller Framework | Use the Apple Game Controller Framework for compatible devices. (Only available when Input Source is set to Native.) |
| Assign Joysticks by GC Player Id | If this option is enabled, joysticks will be assigned to Rewired Players based on the native player id assigned by the Game Controller Framework. This option ensures that the joystick will match to the correct Rewired Player when auto-assigned. This option overrides some other joystick auto-assignment settings. More than one joystick will be assigned to a Player if multiple joysticks are found for that system player id. NOTE: This option only applies to devices handled by the Apple Game Controller Framework. It does not apply to HID devices handled by IO Kit or any other input source. |
| Enhanced Device Support | Enable low-level enhanced support for certain devices. If enhanced support is available for a particular device, this will enable device-specific features such as vibration / force feedback, lights, gyroscopes, accelerometers, touchpads, etc. (Only available when Input Source is set to Native.) |
| Enhanced Device Support Options | Excluded Devices - A list of device types that will be excluded from Enhanced Device Support on this platform. A device that is excluded from Enhanced Device Support will treated like any other controller and will be handled by the primary and/or secondary input sources for the platform, and any special controller features provided by Enhanced Device Support will not be available. |
| Support XR Controllers (Unity Input System) | Uses Unity Input System to support XR controllers. XR controllers supported by Unity Input System will be handled using Unity Input System and all other controllers will be handled using the primary and secondary input sources. (Only available when Input Source is set to Native.) (Unity 2021.2.0f1+) |
| Linux: | |
| Input Source | The primary input source for the Linux Standalone platform. Native - Use native input for the input source. This provides the best device support. SDL2 - Use SDL2 for the input source. This option requires the SDL2 runtime library to be installed. Note: SDL2 does not support as many devices as other native input sources. Unity Input Manager - Use Unity Input Manager (legacy). (Not recommended) Unity Input System - Use Unity Input System. (Not recommended) (Unity 2021.2.0f1+) |
| Enhanced Device Support | Enable low-level enhanced support for certain devices. If enhanced support is available for a particular device, this will enable device-specific features such as vibration / force feedback, lights, gyroscopes, accelerometers, touchpads, etc. Enhanced Device Support on Linux requires UDEV rules to be set up by the end-user. See this for more information. (Only available when Input Source is set to Native.) |
| Enhanced Device Support Options | Excluded Devices - A list of device types that will be excluded from Enhanced Device Support on this platform. A device that is excluded from Enhanced Device Support will treated like any other controller and will be handled by the primary and/or secondary input sources for the platform, and any special controller features provided by Enhanced Device Support will not be available. |
| Support XR Controllers (Unity Input System) | Uses Unity Input System to support XR controllers. XR controllers supported by Unity Input System will be handled using Unity Input System and all other controllers will be handled using the primary and secondary input sources. (Only available when Input Source is set to Native.) (Unity 2021.2.0f1+) |
| iOS: | |
| Input Source | The primary input source for the iOS platform. UnityInputManager - Use Unity Input Manager (legacy). UnityInputSystem - Use Unity Input System. (Unity 2021.2.0f1+) Preferred Unity - Use the Preferred Unity Input Source. |
| tvOS: | |
| Input Source | The primary input source for the tvOS platform. UnityInputManager - Use Unity Input Manager (legacy). UnityInputSystem - Use Unity Input System. (Unity 2021.2.0f1+) Preferred Unity - Use the Preferred Unity Input Source. |
| Android: | |
| Input Source | The primary input source for the Android platform. UnityInputManager - Use Unity Input Manager (legacy). UnityInputSystem - Use Unity Input System. (Unity 2021.2.0f1+) Preferred Unity - Use the Preferred Unity Input Source. |
| Support Unknown Gamepads | Treat all unrecognized controllers as gamepads using the standardized Android gamepad layout. All recognized controllers will be treated normally. Warning: While most Android gamepads conform to this layout, there are exceptions. Addtionally, with this option enabled, all unrecognized non-gamepad joystick devices used will be limited to only the set of elements available on a gamepad. If your game needs to support devices other than Android gamepads, disable this option. This option only applies to the Android platform. (Only applies to UnityInputManager input source.) |
| Windows UWP: | |
| Input Source | The primary input source for the Windows 10 Universal platform. Native - Use native input for the input source. This provides the best device support. Unity Input System - Use Unity Input System. (Not recommended) (Unity 2021.2.0f1+) |
| Use Gamepad API | Use Windows.Gaming.Input.Gamepad for compatible devices. Also enables special features for compatible devices such as vibration. (Only available when Input Source is set to Native.) |
| Use HID API | This allows support for older gamepads, gamepads made for Android, flight controllers, racing wheels, etc. In order to use this feature, you must add support for HID gamepads and joysticks to the app manifest file. Please see the Special Platform Support -> Windows 10 Universal documentation for details. (Only available when Input Source is set to Native.) |
| Support XR Controllers (Unity Input System) | Uses Unity Input System to support XR controllers. XR controllers supported by Unity Input System will be handled using Unity Input System and all other controllers will be handled using the primary and secondary input sources. (Only available when Input Source is set to Native.) (Unity 2021.2.0f1+) |
| Xbox One (Game Core) | (Unity 2017, Unity 2019+) Platform plugin required. |
| Xbox Series (Game Core) | (Unity 2017, Unity 2019+) Platform plugin required. |
| Xbox One (XDK): | (< Unity 2022) |
| Input Source | The primary input source for the Xbox One platform. Native - Use native input for the input source. This provides the best device support. |
| PS4: | (Unity 2017+) Platform plugin required. |
| PS5: | (Unity 2017, Unity 2019+) Platform plugin required. |
| Switch: | (Unity 5+) Platform plugin required. |
| Switch 2: | (Unity 6000+) Platform plugin required. |
| WebGL: | |
| Input Source | The primary input source for the WebGL Standalone platform. Native - Use native input for the input source. This provides the best device support. Unity Input System - Use Unity Input System. (Not recommended) (Unity 2021.2.0f1+) |
| Input Source | The primary input source for the WebGL platform. Native - Use native input. |
| Each Platform: | Options here appear in all individual platform pages. |
| Disable Keyboard | Disable keyboard input on this platform? Disabling this can improve performance slightly. |
| Disable Mouse | Disable mouse input on this platform? Disabling this can improve performance slightly. |
| Ignore Input When App Not In Focus | Ignores input if the application is not in focus. This setting has no effect on some platforms. NOTE: Disabling this does not guarantee that input will be processed when the application is out of focus. Whether input is received by the application or not is dependent on A) the input device type B) the current platform C) the input source(s) being used. |
| Joystick Auto-Assignment: | NOTE: Joystick Auto-Assignment applies to Joysticks only (controllers other than keyboard or mouse.) Joystick Auto-Assignment does not consider whether a Player has Keyboard Maps assigned, so it will not skip assigning joysticks to Players that are using the keyboard. |
| Auto-Assign Joysticks | Automatically assign joysticks to players as they are connected. |
| Max Joysticks Per Player | How many joysticks is a player allowed to be assigned? If enabled, connected joysticks will be assigned to each player up to this limit. |
| Assign To Playing Players Only | Only assign joysticks to players that have isPlaying = true. Non-playing players will not be assigned joysticks. |
| Distribute Joysticks Evenly | When auto-assigning joysticks, assign to players with the fewest number of joysticks first. Will assign up to the limit of Max Joysticks Per Player. |
| Reassign To Previous Owner | When a joystick is disconnected and reconnected, attempt to reassign the joystick to the last player it was assigned to. |
| Global Settings: | |
| Default Joystick Dead Zone Type | The default calculation type for joystick axis dead zones. Radial: X and Y are combined and the dead zone is calculated on the length of the vector. This allows smooth sweeping in a circular motion. This is the best choice for most games. Axial: X and Y axes are calculated independently. Use this if your game requires more precise 4-directional movement (ie: some platformers, chess games, etc.)
|
| Default Joystick Sensitivity Type | The default calculation type for joystick axis sensitivity. Radial: X and Y are combined and the sensitivity is calculated on the length of the vector. Axial: X and Y axes are calculated independently. This setting only applies to joysticks on recognized controllers. |
| Default Axis Sensitivity Type | Determines how axis sensitivity will be calculated by default. Multiplier: Value is multiplied by sensitivity. Power: Value is raised to a power. Curve: Value is multiplied by a point on a curve. |
| Activate Action Buttons on Negative Value | Determines how button values are calculated by Player Actions. If enabled, Actions with either a negative or positive Axis value will return True when queried with player.GetButton. If disabled, Actions with a negative Axis value will always return False when queried with player.GetButton, and must be queried with player.GetNegativeButton. |
| Force 4-Way Hats | Force all 8-way hats on recognized joysticks to be treated as 4-way hats. If enabled, the corner directions on all hats will activate the adjacent 2 cardinal direction buttons instead of the corner button. This is useful if you need joystick hats to behave like D-Pads instead of 8-way hats. |
| Throttle Calibration Mode | Determines how throttles on recognized controllers are calibrated. By default, throttles are calibrated for a range of 0 to +1. This is suitable for most flight and racing games. Some games may require a range of -1 to +1 such as space flight games where a negative value denotes a reverse thrust. Changing this setting will revert all throttle calibrations to the default values for the chosen calibration mode. |
| Defer Controller Connected Events On Start | Defer controller connected events for controllers already connected when Rewired initializes until the Start event instead of during initialization. Normally, it's impossible to receive controller connection events at the start of runtime because Rewired initializes before any other script is able to subscribe to the controller connected event. Enabling this will defer the controller connected events until the Start event, allowing your scripts to subscribe to the controller connected event in Awake and still receive the event callback. If disabled, controller connection events for controllers already connected before runtime starts will be missed. |
| Key Combination Override Mode | Determines how Actions bound keys that are also used in key combinations behave. Example: Ctrl is bound to Action1 and Ctrl + W is bound to Action 2. When Ctrl is pressed, Action1 activates until W is also pressed. This enum defines how the underlying Action1 bound to Ctrl will behave when H is pressed and when H is released. When Ctrl + H is pressed, the key combination overrides Action1 and it returns a value of False. None: All key combination override handling is disabled for all keys including modifier and primary keys. Even if a key combination includes a key that is already bound to an Action, both the Action bound to the key combination and the Action bound to the individual key will return true when pressed. Example: W is bound to Action1. Cntl + W is bound to Action2. When Cntl + W is pressed, both Action1 and Action2 return true. Pause: An Action bound to a modifier key that is a member of a key combination will return False for the duration that the key combination is active. When any key of the overriding key combination is released, the Action bound to the modifier key will no longer be overridden and return a True value if the key is still pressed. Cancel: An Action bound to a modifier key that is a member of a key combination will return False until the key is released and pressed again. The Action of the member key is canceled by the key combination override. Overlap: An Action bound to a modifier key that is a member of a key combination will return True as long as the key is held and will not have its value overridden by the key combination unless the modifier key matches the primary key of the key combination. Actions bound to each modifier key in the key combination will return value along with the Action bound to the key combination. Example: Cntl is bound to Action1. Cntl + W is bound to Action2. When Cntl + W is pressed, both Action1 and Action2 return true. Note that this does not apply to the primary key of a key combination. In the previous example, an Action bound to W alone does not return true when Cntl + W is pressed. This also does not apply to key combinations themselves. Key combinations can be overridden by other key combinations that have more modifiers. Example: Cntl + W is bound to Action1. Cntl + Shift + W is bound to Action2. When Cntl + Shift + W is pressed, Action2 returns true, but Action1 returns false. If a key combination is overridden by another key combination that has more modifiers, the overridden key combination will return false until all constiutent keys are released and pressed again. |
| Generate Key Events On Key Combo Override | Determines if key up and down events are generated when the Action(s) bound to one or more modifier keys that are part of a key combination are overridden and resumed when the succeeding key(s) in the key combination are pressed or released. Example: Cntl is bound to Action1. Cntl + W is bound to Action2. When Cntl is pressed, Action1 generates Down and On events. When W is pressed while Cntl is held, should Action1, bound to Cntl, generate an Up event (because it has been overridden and is now off). Similarly, when Cntl + W is held and W is released, if Key Combination Override Mode is set to Momentary, should Action1, bound to Cntl, generate a Down event (because it is no longer overridden and resumes returning True)? |
| Logging | Determines the level of internal logging. |
| Editor Settings: | |
| Allow Input in Editor Scene Views | If enabled, input will be allowed when any Scene View has focus. This option will have no effect when native input is not used as the input source for a device. Note: Due to the limitated information available from the Unity Editor about the current state of focus, when this option is enabled, input will still be processed when the Unity Editor is not in focus on OSX and Linux. |
Tools
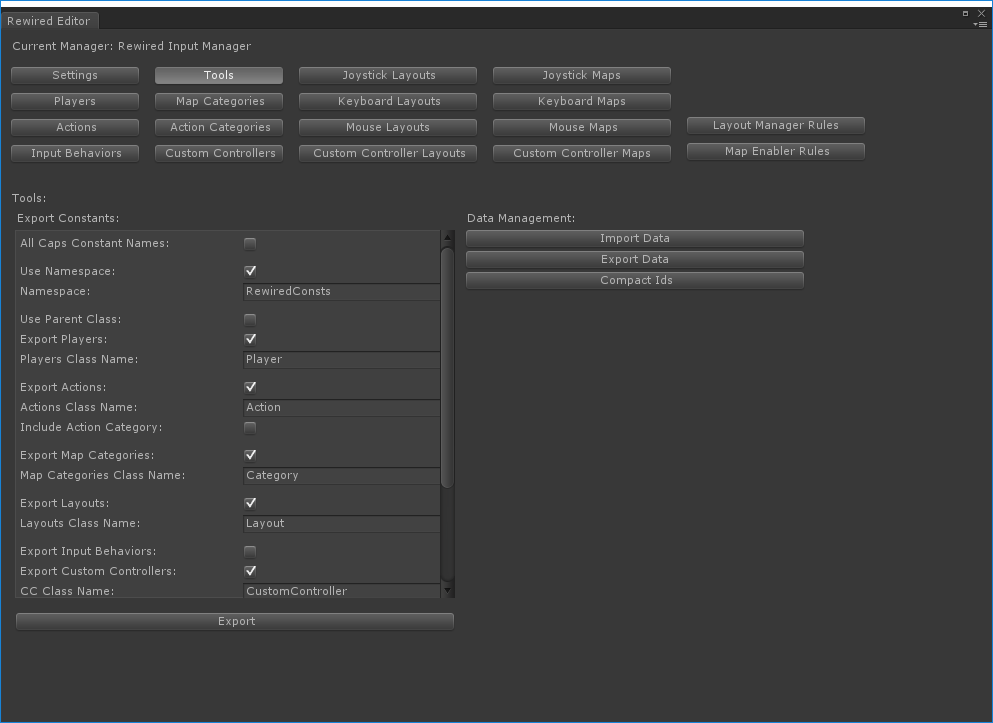
Export Constants:
Allows you to export a list of constants for all Rewired Actions, Map Categories, and Layouts. These constants can be used in place of strings when interacting with the Rewired API. Clicking "Export" will create a CS file which must be saved somewhere in your project.
Note: The exported consts will only be valid for this Rewired Input Manager. Also, if you add or delete items from the Rewired Input Manager, this list must be exported again.
(See How To's - Exporting constants for use in scripting for more information.)
| All Caps Constant Names | Constant names will be written in all capital letters. |
| Use Namespace | Wrap all the exported classes in a namespace. |
| Namespace | The namespace. Only valid C# namespace characters are allowed. |
| Use Parent Class | Wrap all the exported classes in a single parent class for better organization. |
| Parent Class Name | Name of the parent class. Only valid C# class name characters are allowed. This class name must be unique. |
| Export Players | Export Players to a class of constants. |
| Players Class Name | Name of the class that will contain the Player constants. Only valid C# class name characters are allowed. This class name must be unique. |
| Export Actions | Export Actions to a class of constants. |
| Actions Class Name | Name of the class that will contain the Action constants. Only valid C# class name characters are allowed. This class name must be unique. |
| Include Action Category | Includes the Action Category name in the Actions list. |
| Create Action Category Classes | If enabled, a separate class will be created for each Action Category and Action constants will be generated inside these classes. If disabled, includes the Action Category in the name of each constant. The Action Category name will preceed the Action name for the final const name. Example: public const int Default_Jump = 1; Otherwise, the Action name alone will be used. Example: public const int Jump = 1; |
| Export Map Categories | Export Map Categories to a class of constants. |
| Map Categories Class Name | Name of the class that will contain the Map Category constants. Only valid C# class name characters are allowed. This class name must be unique. |
| Export Layouts | Export Layouts to a class of constants. |
| Layouts Class Name | Name of the class that will contain the Layout constants. Only valid C# class name characters are allowed. This class name must be unique. Layout constants will be wrapped in an additional class named for the Layout type. |
| Export Custom Controllers | Export Custom Controllers to a class of constants. |
| CC Class Name | Name of the class that will contain the Custom Controller constants. Only valid C# class name characters are allowed. This class name must be unique. |
| CC Axes Class Name | Name of the class that will contain the Axis constants. Only valid C# class name characters are allowed. This class name must be unique. |
| CC Buttons Class Name | Name of the class that will contain the Button constants. Only valid C# class name characters are allowed. This class name must be unique. |
Data Management:
| Import Data | Import data from a file. Imported data can replace or be merged with existing data. |
| Export Data | Export all data to a file. |
| Compact Ids | Re-number all id's so they start at 0 and are sequential with no missing values. |
Misc:
Players
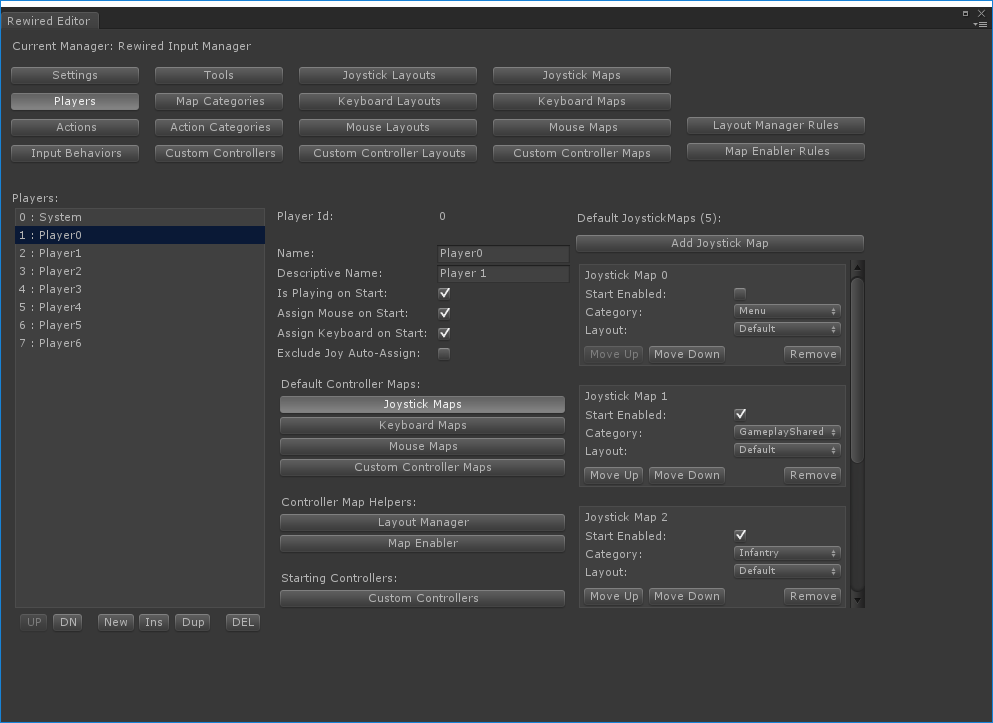
The Players page allows you to create and edit Players.
Players are at the center of input in Rewired. Generally, you will always get input from the Player and not from the controllers directly. Because of this, it is necessary to always create at least one Player. (See Players for more detailed information.)
Players must be assigned controller maps before controls can be mapped to actions. First you create maps in Joystick Maps, Keyboard Maps, Mouse Maps, and Custom Controller Maps, then assign them to each Player.
Player Properties:
| Player Id | The id of the Player. This can be used to get the player via scripting. (Read-only) |
| Name | Used to access the player via scripting. Must be unique. |
| Descriptive Name | The descriptive name which can be shown to players. |
| Key | Key to identify the Player. This is used for localization and glyph lookup. |
| Is Playing on Start | Does this Player start with isPlaying = true? This affects controller auto-assignment if you're using that option. |
| Assign Mouse on Start | Assign the Mouse to this Player on start. |
| Assign Keyboard on Start | Assign the Keyboard to this Player on start. |
| Exclude Joy Auto-Assign | Determines whether Joysticks can be auto-assigned to this Player. |
To create a new Player:
Click the "New" button below the "Players:" box.
To name a Player:
Edit the "Name" and "Descriptive Name" fields in the second column.
To create a Custom Controller:
Click the "Custom Controllers" button under "Starting Controllers" then click the "Add Custom Controller" button and choose a controller.
Note: Custom Controllers, unlike Joysticks, are instantiated for each player. When you add a Custom Controller, the controller will be created on game start and assigned to the Player. If you add the same controller to multiple Players, the Custom Controller will be instantiated for each, therefore setting a Tag on each can be helpful to differentiate the controllers.
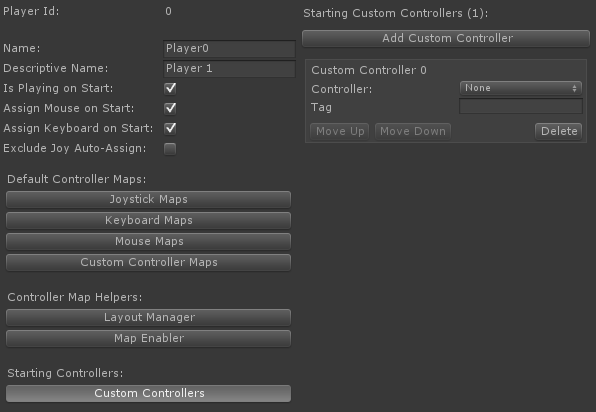
Custom Controller Options:
| Controller | The controller to instantiate for this player. |
| Tag | Sets a tag on this player's controller. Can be used to get the controller via scripting. |
To assign a controller map:
Under "Default Controller Maps", click the button that corresponds to the type of Controller Map you wish to assign. Then, click "Add Joystick Map" (or whatever map type you chose) and change the settings. These represent the Controller Maps that will loaded by default in the Player at start or whenever a new Joystick or Custom Controller is assigned to the Player.
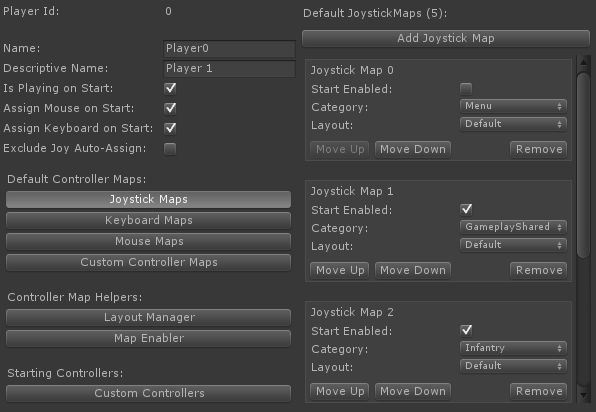
Controller Map Options:
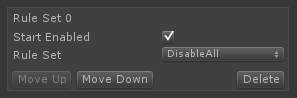
| Start Enabled | Does this controller map start enabled? If set to false, all controls in this map will be ignored. |
| Category | The category of the controller map. |
| Layout | The layout of the controller map. |
To configure Layout Manager settings:
Under "Controller Map Helpers", click the "Layout Manager" button. Layout Manager Settings will be shown in the right column.
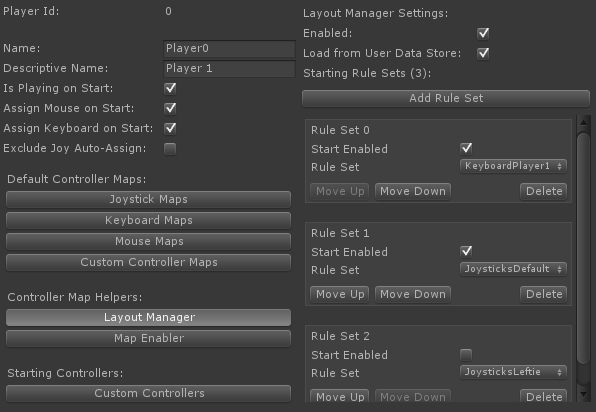
Layout Manager Settings:
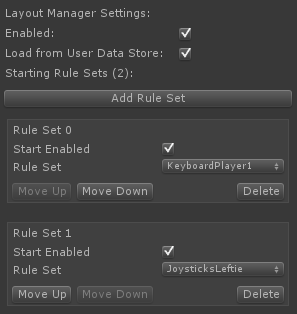
| Enabled | If enabled, the Controller Map Layout Manager will be used in this Player to manage what Controller Maps are loaded based on the Rule Sets assigned. |
| Load from User Data Store | If enabled, Controller Maps will be loaded from UserDataStore (if available) instead of from the Rewired Input Manager defaults. If no matching Controller Map is found in UserDataStore, the Rewired Input Manager default will be loaded. Note: The UserDataStore implementation must implement IControllerMapStore to be used. |
| Starting Rule Sets | The list of starting Rule Sets. |
To assign Layout Manager Rule Sets:
Click "Add Rule Set" to add a Rule Set to the list. Before you can add Rule Sets here, you must first create some Layout Manager Rule Sets. You can add any number of Rule Sets to the list. These Rule Sets will be assigned to the Player's Layout Manager on start and their rules applied.
Layout Manager Rule Set Options:
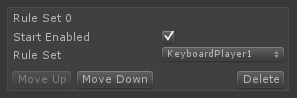
| Start Enabled | If true, the Rule Set will start enabled and be evaluated. Otherwise, it will start disabled and will be ignored. |
| Rule Set | The rule set. |
To configure Map Enabler settings:
Under "Controller Map Helpers", click the "Map Enabler" button. Map Enabler Settings will be shown in the right column.
To assign Map Enabler Rule Sets:

Map Enabler Rule Set Options:
| Enabled | |
| Starting Rule Sets | The list of starting Rule Sets. |
To assign Map Enabler Rule Sets:
Click "Add Rule Set" to add a Rule Set to the list. Before you can add Rule Sets here, you must first create some Map Enabler Rule Sets. You can add any number of Rule Sets to the list. These Rule Sets will be assigned to the Player's Map Enabler on start and their rules applied.
Map Enabler Rule Set Options:
| Start Enabled | If true, the Rule Set will start enabled and be evaluated. Otherwise, it will start disabled and will be ignored. |
| Rule Set | The rule set. |
Actions
The Actions page allows you to create and edit Actions.
Category Box:
Select a category to see the Actions in this category.
Click "Edit Categories" to add or edit Action Categories.
Action Box:
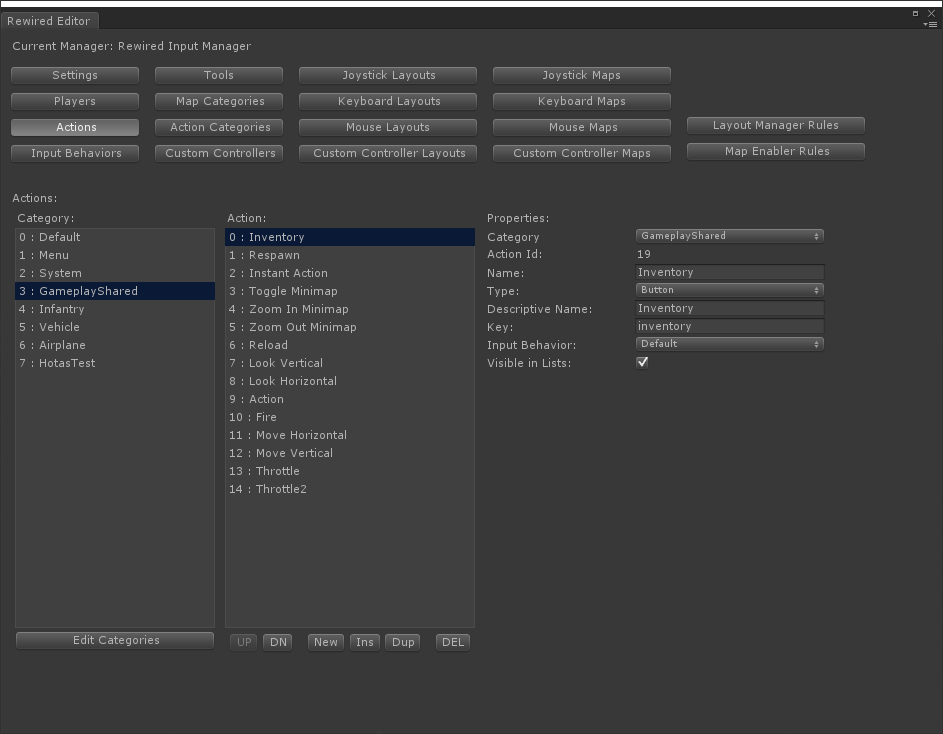
Select an Action to modify its properties.
Action Properties:
| Category | The Action Category to which the Action belongs. |
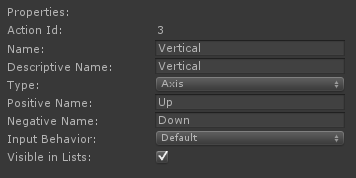
| Action Id | Unique identifier for the Action. Can be used to get the value of the action via scripting. |
| Name | Used to get the value of the action via scripting. Must be unique. |
| Descriptive Name | The descriptive name that can be shown to players when mapping controls. This name is shown for axes (when not mapped as a split axis) and for buttons. |
| Key | Key to identify the Action. This is used for localization and glyph lookup. |
| Type | The type of element you expect to map to this action. This is to help with user control mapping so you can map split axes. Even if set to Button, full axis data will still be available from GetAxis. |
| Positive Name | Descriptive name for the positive pole of the axis. This can be shown to players if mapping a split axis. |
| Negative Name | Descriptive name for the negative pole of the axis. This can be shown to players if mapping a split axis. |
| Input Behavior | The behavior that determines the final processed axis and button values of this action. |
| Visible in Lists | Determines whether this action appears in certain lists such as in a control remapping UI.. |
Input Behaviors
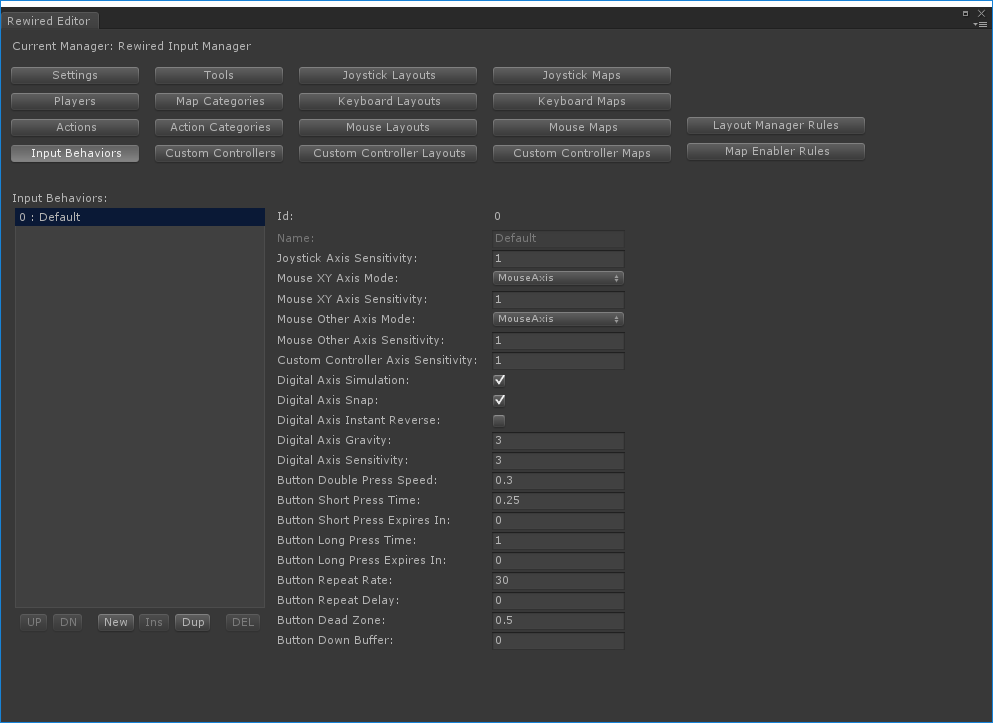
The Input Behaviors page allows you to create and edit Input Behaviors.
Input Behaviors allow you to set options for digital axis simulation (sensitivity, gravity, etc.), how to handle mouse axes, a GetButtonDown buffer, button double press speed, button dead zone, and more. You can assign an Input Behavior to an Action on the Actions page.
Input Behavior Properties:
| Name | The name of this Input Behavior. |
| Joystick Axis Sensitivity | All joystick axes are multiplied by this value. |
| Digital Axis Simulation | Enables digital axis simulation which makes button or key presses contribute to an Action's axis value gradually over time based on gravity and sensitivity. This only affects axis values generated by button and key presses. |
| Digital Axis Snap | When input is received in the opposite direction of the current flow, snap axis value to 0 and continue from there. This only affects axis values generated by button and key presses. |
| Digital Axis Instant Reverse | When input is received in the opposite direction of the current flow, reverse the current value to the opposite sign and continue from there. This only affects axis values generated by button and key presses. |
| Digital Axis Gravity | Speed (units/sec) that the axis value falls toward 0. This only affects axis values generated by button and key presses. |
| Digital Axis Sensitivity | Speed to move toward an axis value of 1.0 in units/sec. This only affects axis values generated by button and key presses. |
| Mouse XY Axis Mode | Affects how mouse X/Y axes contribute to the value. Mouse Axis - Value range that depends on speed of movement. The value can and does exceed +/- 1.0 by a large amount. This value is the same value returned by Unity's Input.GetAxis when axis type is set to Mouse Movement. Mouse Sensitivity is multiplied by the axis value. Digital Axis - Any mouse movement returns a value from -1.0 to 1.0 and is smoothed by the digital axis filters. This makes mouse movement behave like a button or key press. ScreenPositionDelta - A value from -1.0 to 1.0 that represents the distance moved across the screen over the update cycle. The value is normalized based on the width and height of the screen. A movement across the entire screen distance in one update cycle will return +/- 1.0. Speed - A value based on the speed the mouse is moved across the screen. Speed is calculated from the mouse movement delta / delta time. The returned value can exceed +/- 1.0. |
| Mouse XY Axis Sensitivity | (If Mouse XY Axis Mode = MouseAxis) |
| Mouse XY Delta Calc | (If Mouse XY Axis Mode = ScreenPositionDelta or Speed) If you need the delta consistent between X and Y movement, change this to ScreenWidth or ScreenHeight and the delta will be calculated based on only one dimension. Note that the returned value may exceed +/- 1.0 if set to a value other than Normal. |
| Mouse Other Axis Mode | Affects how mouse axes other than X/Y contribute to the value. This affects the mouse wheel axis. Mouse Axis - Value range goes beyond -1 to 1 depending on speed of movement. This value is the same value returned by Unity's Input.GetAxis when axis type is set to Mouse Movement. Mouse Other Axis Sensitivity is multiplied by the axis value. Digital Axis - Any movement returns -1 to 1 and is smoothed by digital axes values. Mouse movement behaves like a button or keyboard key press. Mouse sensitivity does not affect this mode. Instead, all Digital Axis filters are applied. |
| Mouse Other Axis Sensitivity | (If Mouse Other Axis Mode = MouseAxis) All mouse axes except X/Y are multiplied by this value. |
| Custom Controller Axis Sensitivity | All Custom Controller axes are multiplied by this value. |
| Button Double Press Speed | Time in seconds in which to register a button double-press or double-click. |
| Button Short Press Time | Time in seconds that a button or axis must be held to register a short press. |
| Button Short Press Expires In | Time in seconds after a short press is registered after which it will expire and no longer return true for any button events. For example: If you want the press to expire 2 seconds after the press first registers true, set this value to 2. This is useful, for example, if you want short and long presses to be mutually exclusive. [0 = Never expires] |
| Button Long Press Time | Time in seconds that a button or axis must be held to register a long press. |
| Button Long Press Expires In | Time in seconds after a long press is registered after which it will expire and no longer return true for any button events. For example: If you want the press to expire 2 seconds after the press first registers true, set this value to 2. [0 = Never expires] |
| Button Repeat Rate | The number of times per second the button state will be True when queried with GetButtonRepeating or the equivalent event. |
| Button Repeat Delay | The duration in seconds before repeating will begin after the initial press when queried with GetButtonRepeating or the equivalent event. [0 = No delay] |
| Button Dead Zone | When an action's axis value is below this threshold, GetButton will return false. This is useful if you map axes as buttons. If the value is too low, GetButton may always return true. If the value is 1, it will never return true. |
| Button Down Buffer | Time in seconds to buffer GetButtonDown results. This makes GetButtonDown return TRUE for extra time beyond a single frame. This is useful to prevent missing button presses when pressing very rapidly and the game ignores these presses due to some blocking action. Ex: Punching in rapid succession, but presses are ignored during the punch animation. The buffer value should generally be very small such as 0.08 s, but this will depend on your specific needs. |
Map Categories
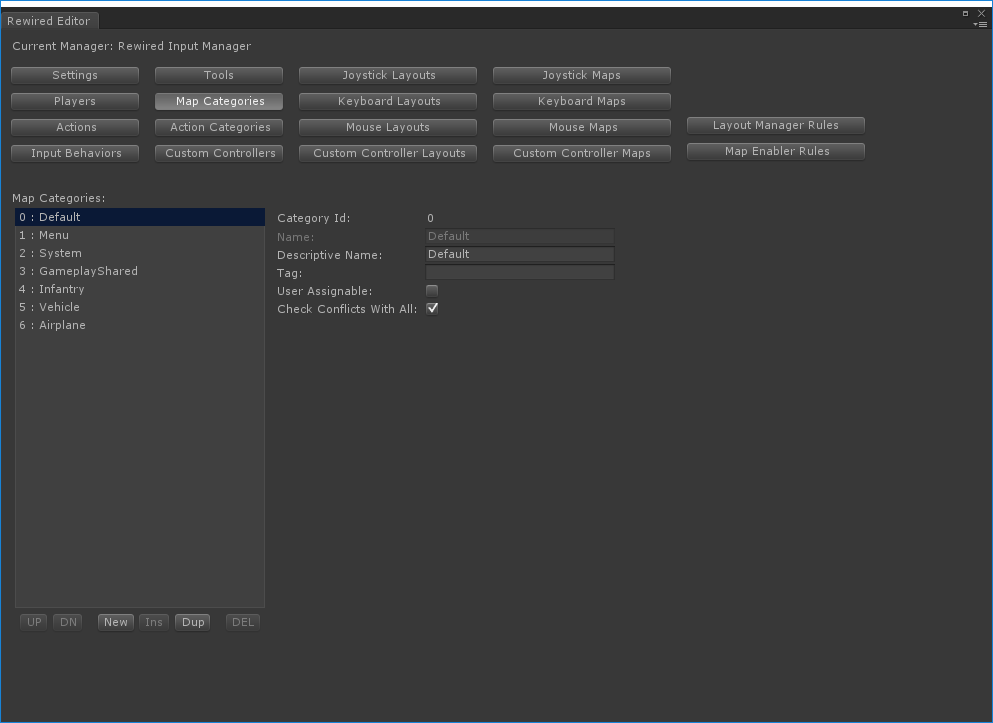
The Map Categories page allows you to create and edit Map Categories.
See Map Categories for more information.
Map Category Properties:
| Category Id | Can be used to get the category via scripting. |
| Name | The name of the category. Used for finding content by category in scripting. Must be unique. |
| Descriptive Name | The descriptive name that can be shown to players. |
| Key | Key to identify the Map Category. This is used for localization and glyph lookup. |
| Tag | Allows you to tag a group of categories and search for categories by tag in scripting. |
| User Assignable | Determines whether this category appears in certain lists. Also determines whether element assignments can be automatically removed by conflict checking. If not user assignable, conflict checking cannot automatically remove the assignments. This can be used to protect certain elements and prevent the user from mapping actions to those elements which are used for system actions. For example, ESC. |
| Check Conflicts With All | Determines what map categories to check against for assignment conflicts when the user is mapping a control to a map in this category. True = check maps in all categories. |
| Check Conflicts With Specific Categories | Add specific categories you want to allow conflict checking against. Note that this is not a two-way setting. It only affects conflict checking from controls in this category to the other category. If you want to enable/disable checking for the reverse direction, you must set it in the other category. |
Action Categories

The Action Categories page allows you to create and edit Action Categories.
Action Categories can be used to organize your Actions. Action Categories can also be used in a user control mapping UI to display categorized lists of Actions to the user.
Action Category Properties:
| Category Id | Can be used to get the category via scripting. (Read-only) |
| Name | The name of the category. Used for finding content by category in scripting. Must be unique. |
| Descriptive Name | The descriptive name that can be shown to players. |
| Key | Key to identify the Action Category. This is used for localization and glyph lookup. |
| Tag | Allows you to tag a group of categories and search for categories by tag in scripting. |
| Visible in Lists | Determines whether this category appears in certain lists such as in a control remapping UI. |
Custom Controllers
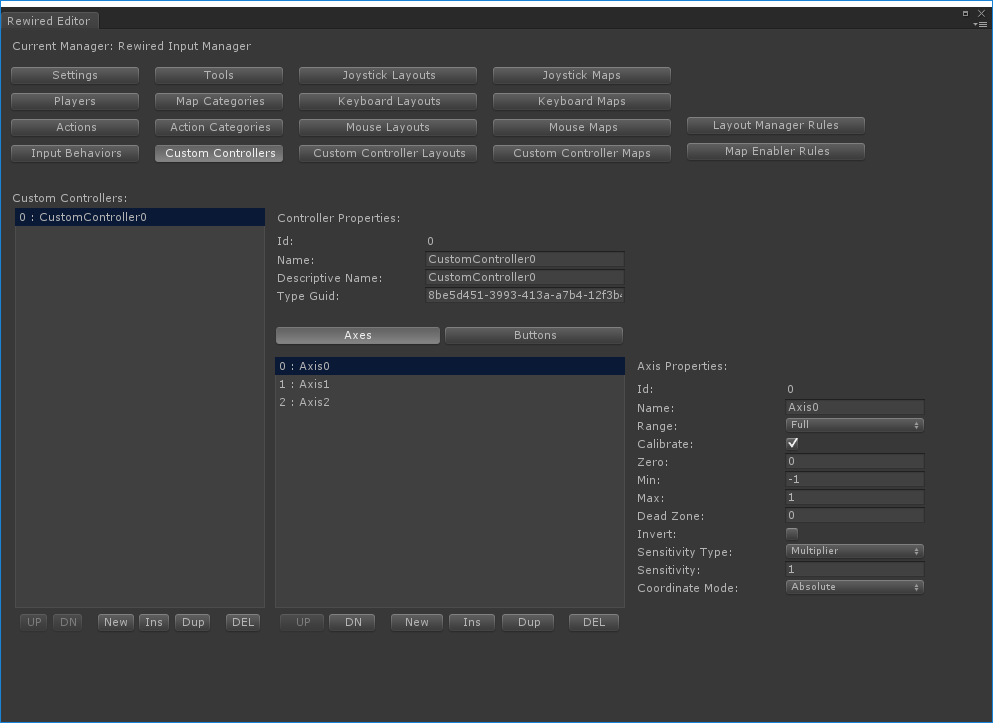
The Custom Controllers page allows you to create and edit Custom Controllers.
Custom Controllers are virtual controllers that you can customize, adding as many axes and buttons as you need. Any value can be used to drive the controller's element values. For example, Custom Controllers can be used for on-screeen touch controllers. (See the example in the Rewired/Examples folder.)
Creating a Custom Controller:
Click the "New" button below the "Custom Controllers" box to create a new controller.
Give the controller a Name and Descriptive name under "Controller Properties."
Add axes and buttons to the controller and define properties for each.
Custom Controller Properties:
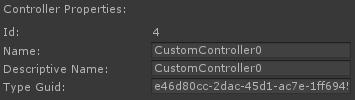
| Id | The source id of the Custom Controller. Note: This does not correspond to the unique id that will be assigned to the controller when it is instantiated, so it can't be used to get the instantiated controller. However, this can be used to instantiate a Custom Controller of this type manually via scripting. |
| Name | The name of the controller. Used in scripting. Must be unique. |
| Descriptive Name | The descriptive name that can be shown to players. |
| Key | The controller key. This is used for localization and glyph lookup. |
| Type Guid | The controller type guid. This is used to uniquely identify Custom Controller type using Controller.hardwareTypeGuid. Each Custom Controller should have a different Guid. |
Axis Properties:
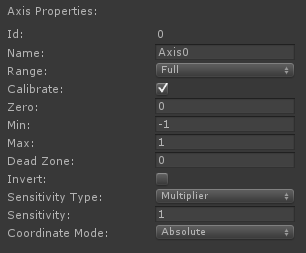
| Id | The element identifier id of the element. Can be used in scripting. |
| Descriptive Name | The descriptive name of the element. This can be used in scripting and can be shown to players. Must be unique. |
| Positive Descriptive Name | The descriptive name of the element's positive axis. (Optional) |
| Negative Descriptive Name | The descriptive name of the element's negative axis. (Optional) |
| Key | Key to identify the element. This is used for localization and glyph lookup. |
Positive Key |
Key to identify the element's positive axis direction. This is used for localization and glyph lookup. |
| Negative Key | Key to identify the element's negative axis direction. This is used for localization and glyph lookup. |
| Range | What portion of the axis's range contributes to the value? Full = Both positive and negative sides of the axis. |
| Calibrate | Scale and clamp values to a min/max range and apply other calibration transformations. Disable this if you want values to pass through unmodified. |
| Zero | The zero point of the axis. |
| Min | The lowest possible value of the axis. [-1 to 1] |
| Max | The highest possible value of the axis. [-1 to 1] |
| Dead Zone | When the axis value falls within the zero point +/- this threshold, the returned value will be zero. |
| Invert | Inverts the final value of the axis. |
| Sensitivity Type | Determines how axis sensitivity will be calculated. Multiplier: Value is multiplied by sensitivity. Power: Value is raised to a power. Curve: Value is multiplied by a point on a curve. |
| Sensitivity | The sensitivity value. (Only available if Sensitivity Type is set to Multiplier or Power.) |
| Sensitivity Curve | The sensitivity curve. (Only available if Sensitivity Type is set to Curve.) |
| Coordinate Mode | The coordinate mode of the axis data. This should be set to Relative for axes that return delta values. |
Button Properties:
| Id | The element identifier id of the element. Can be used in scripting. |
| Name | The name of the element. This can be used in scripting and shown to players. Must be unique. |
| Key | Key to identify the element. This is used for localization and glyph lookup. |
Joystick Layouts
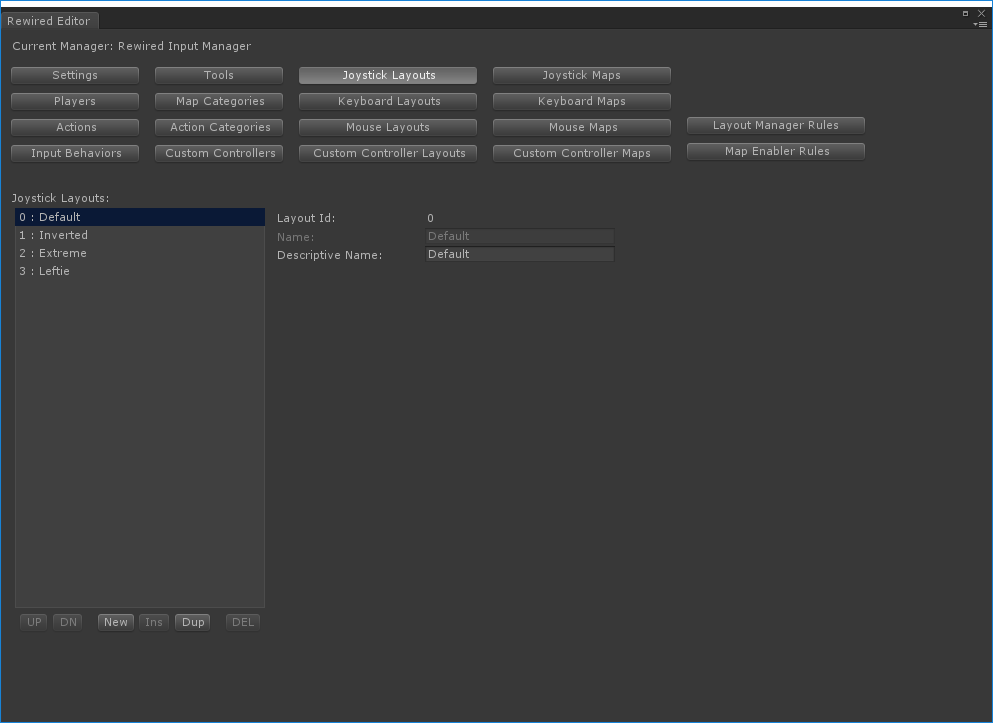
The Joystick Layouts page allows you to create and edit Joystick Layouts.
See Layouts for more information.
Layout Properties:
| Layout Id | Can be used to get the layout via scripting. |
| Name | The name of the layout. Used in scripting. Must be unique. |
| Description | The descriptive name that can be shown to players. |
| Key | Key to identify the Layout. This is used for localization and glyph lookup. |
Keyboard Layouts
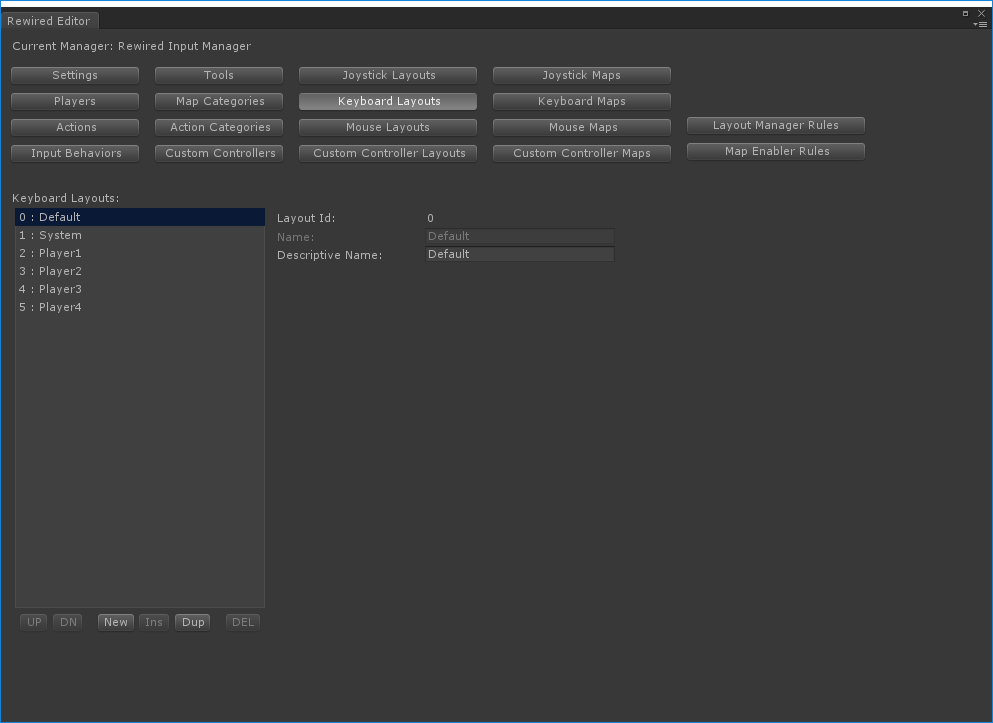
The Keyboard Layouts page allows you to create and edit Keyboard Layouts.
See Layouts for more information.
Layout Properties:
| Layout Id | Can be used to get the layout via scripting. |
| Name | The name of the layout. Used in scripting. Must be unique. |
| Description | The descriptive name that can be shown to players. |
| Key | Key to identify the Layout. This is used for localization and glyph lookup. |
Mouse Layouts
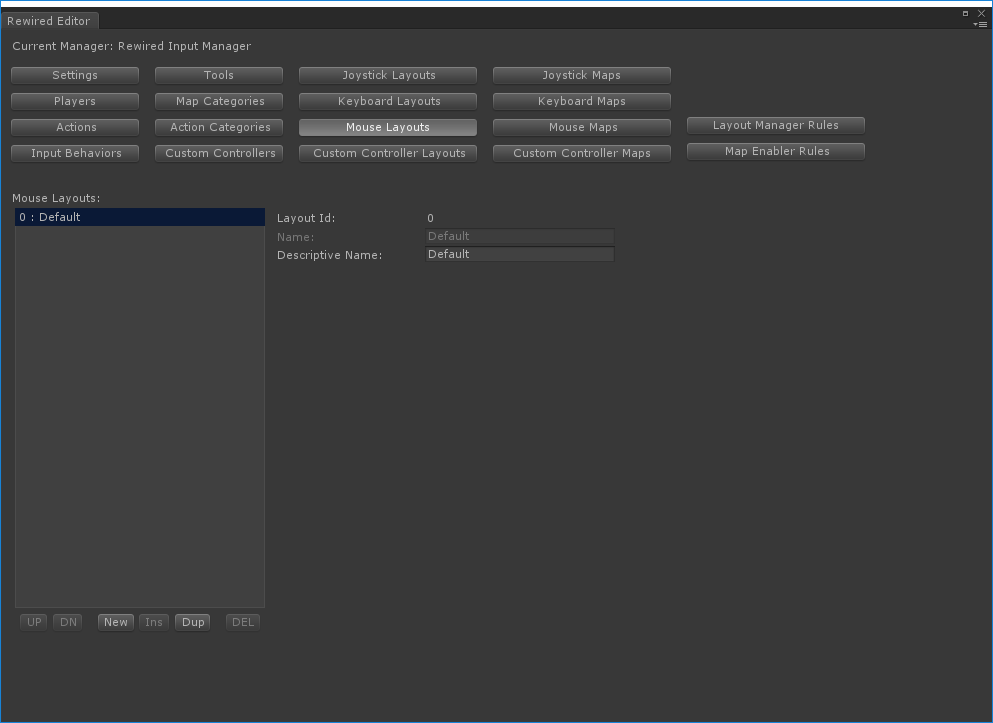
The Mouse Layouts page allows you to create and edit Mouse Layouts.
See Layouts for more information.
Layout Properties:
| Layout Id | Can be used to get the layout via scripting. |
| Name | The name of the layout. Used in scripting. Must be unique. |
| Description | The descriptive name that can be shown to players. |
| Key | Key to identify the Layout. This is used for localization and glyph lookup. |
Custom Controller Layouts
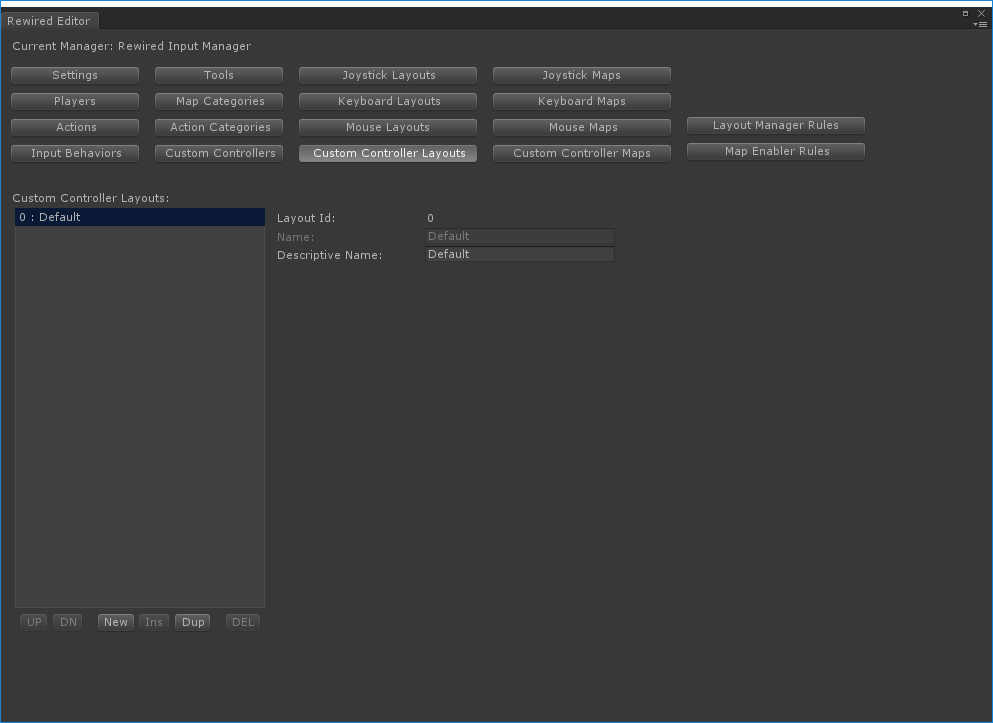
The Custom Controller Layouts page allows you to create and edit Custom Controller.
See Layouts for more information.
Layout Properties:
| Layout Id | Can be used to get the layout via scripting. |
| Name | The name of the layout. Used in scripting. Must be unique. |
| Description | The descriptive name that can be shown to players. |
| Key | Key to identify the Layout. This is used for localization and glyph lookup. |
Joystick Maps
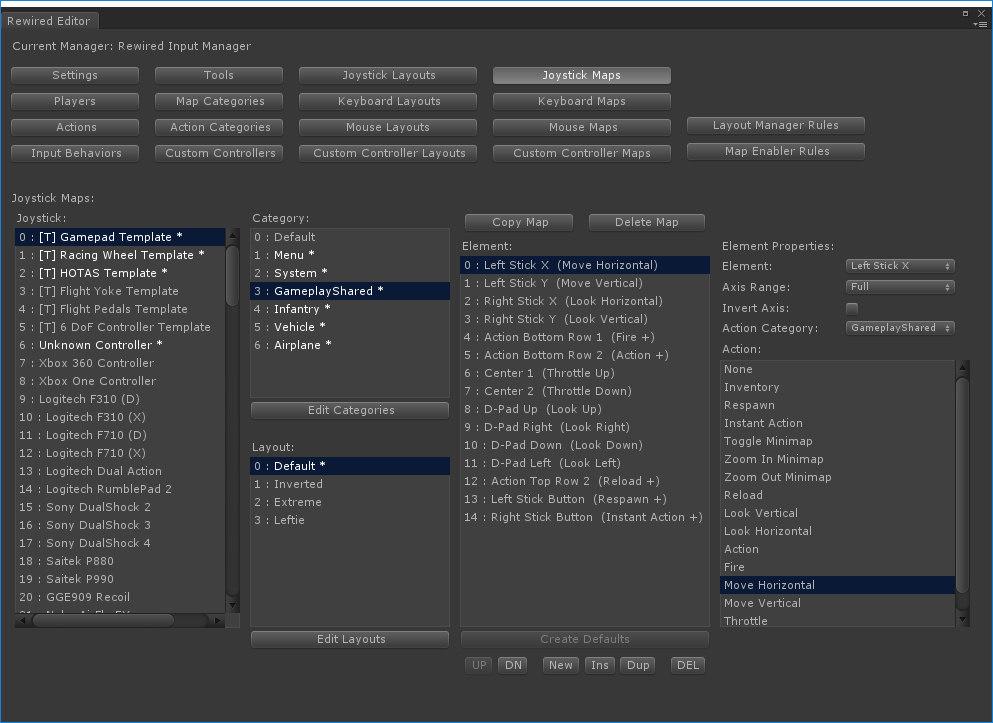
The Joystick Maps page allows you to create and edit Joystick Maps. Controller Maps must be assigned to Players or they will have no effect. See the Players page for more information.
See Controller Maps for more information.
Selecting a Map:
To select a map, you must select the following: 1) A Joystick or Joystick Template, 2) a Category, and 3) a Layout.
Creating a new Map:
Select a joystick/template, a category, and a layout, then click the "Create Map" button. A blank map will be created. You can then add elements to the new map by clicking the "New" button beneath the "Elements" box or by clicking the "Create Defaults" button in the same location. "Create Defaults" will create a series of unassigned elements based on the current joystick. You can then assign actions to these elements. Note: "Create Defaults" is only enabled if the map is empty of elements.
When a Joystick, Template, Category, or Layout has had a map created for it, the name will be displayed in a different color and have an * after it.
Deleting a Map:
Select a joystick/template, a category, and a layout, then click the "Delete Map" button.
Element Properties (Axis):
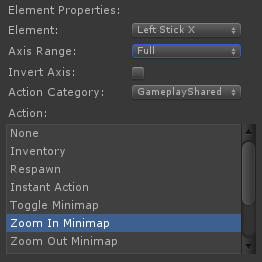
| Element | The controller element. |
| Axis Range | What portion of the axis's range triggers the assigned action? Full = Both positive and negative sides of the axis trigger the action. |
| Invert Axis | Invert the axis? (Only shown if Axis Range is Full) |
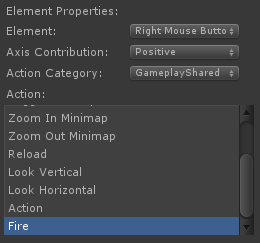
| Axis Contribution | When this element is activated, does it add positive or negative value to the action's final axis value? (Only shown if Axis Range is Positive or Negative) |
| Action Category | The category containing the action to be assigned to this element. |
| Action | The action assigned to this element. |
Element Properties (Button):
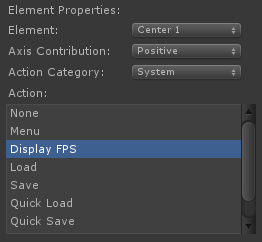
| Element | The controller element. |
| Axis Contribution | When this element is activated, does it add positive or negative value to the action's final axis value? |
| Action Category | The category containing the action to be assigned to this element. |
| Action | The action assigned to this element. |
Keyboard Maps
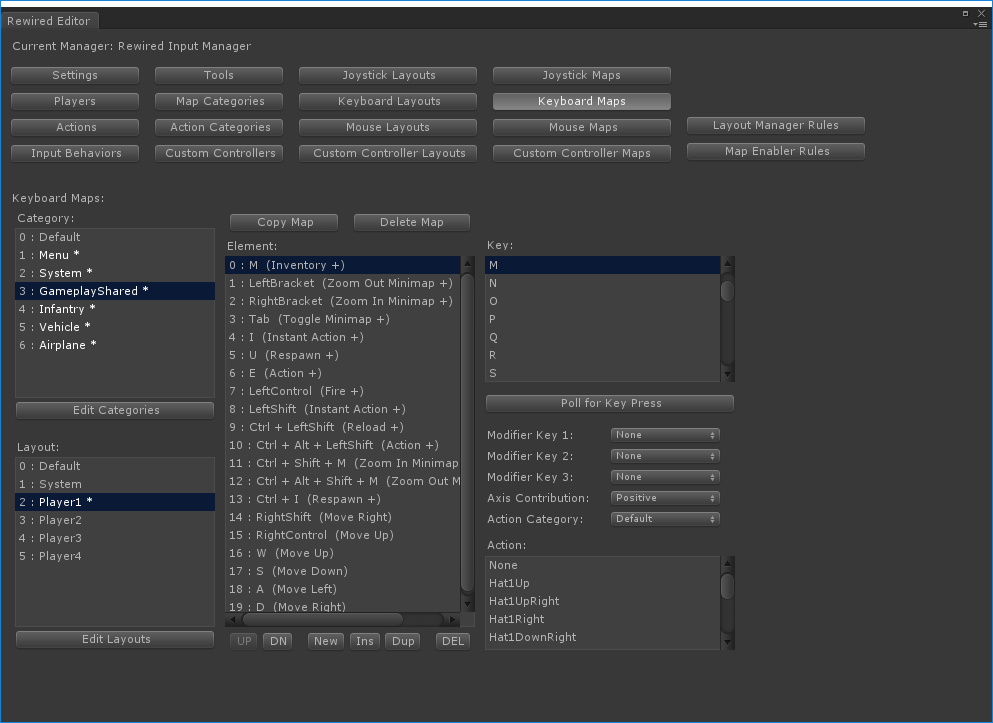
The Keyboard Maps page allows you to create and edit Keyboard Maps. Controller Maps must be assigned to Players or they will have no effect. See the Players page for more information.
See Controller Maps for more information.
Selecting a Map:
To select a map, you must select the following: 1) a Category, and 2) a Layout.
Creating a new Map:
Select a category and a layout, then click the "Create Map" button. A blank map will be created. You can then add elements to the new map by clicking the "New" button beneath the "Elements" box. You can then assign an action to the element.
When a Category or Layout has had a map created for it, the name will be displayed with an (*) after it.
Deleting a Map:
Select a category and a layout, then click the "Delete Map" button.
Element Properties:
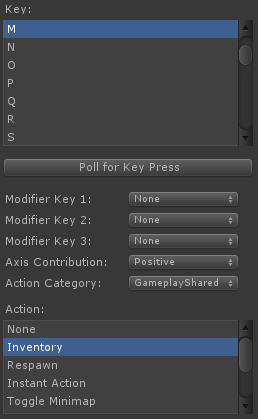
| Key | The keyboard key assigned to this element. |
| Poll for Key Press | Allows you to assign a key by pressing a key on the keyboard. Note: Certain keys may not be assignable via this method such as Left Shift and Right Shift. Those keys can only be assigned manually using the list box. |
| Modifier Key 1 | A modifier key that must be held for this action to return true. The order of multiple modifier key presses makes no difference. NOTE: Many modifier key combos do not work correctly in the Unity editor because the key combos are already mapped to Unity functions. |
| Modifier Key 2 | A modifier key that must be held for this action to return true. The order of multiple modifier key presses makes no difference. |
| Modifier Key 3 | A modifier key that must be held for this action to return true. The order of multiple modifier key presses makes no difference. |
| Axis Contribution | When this key is pressed, does it add positive or negative value to the action's final axis value? |
| Action Category | The category containing the action to be assigned to this element. |
| Action | The action assigned to this element. |
Mouse Maps
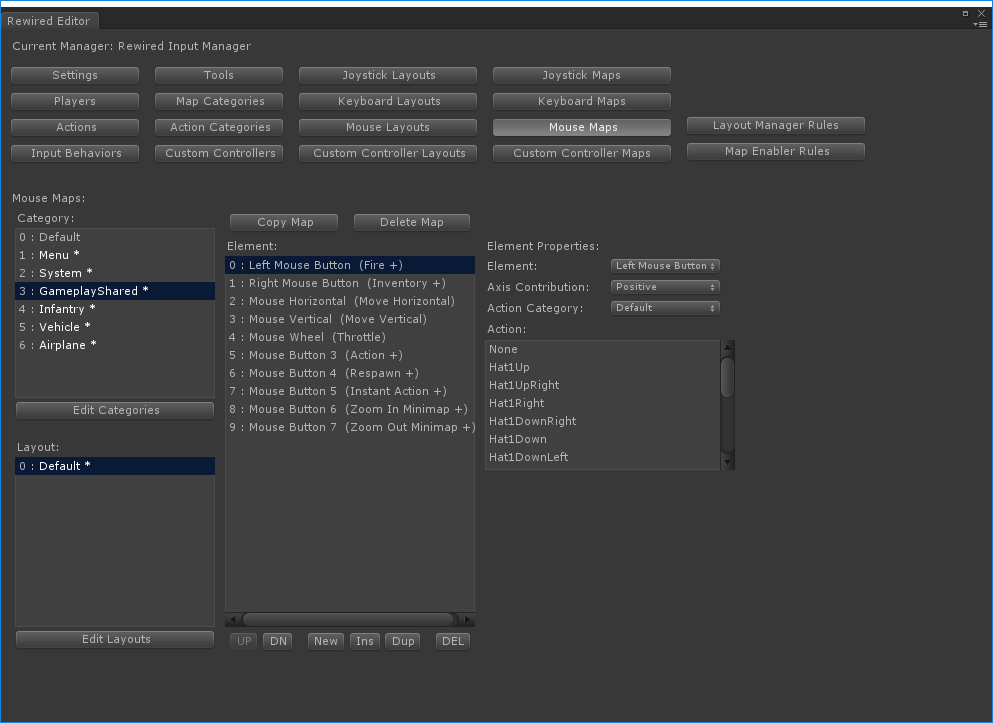
The Mouse Maps page allows you to create and edit Mouse Maps. Controller Maps must be assigned to Players or they will have no effect. See the Players page for more information.
See Controller Maps for more information.
Selecting a Map:
To select a map, you must select the following: 1) a Category, and 2) a Layout.
Creating a new Map:
Select a category and a layout, then click the "Create Map" button. A blank map will be created. You can then add elements to the new map by clicking the "New" button beneath the "Elements" box. You can then assign an action to the element.
When a Category or Layout has had a map created for it, the name will be displayed with an (*) after it.
Deleting a Map:
Select a category and a layout, then click the "Delete Map" button.
Element Properties (Axis):
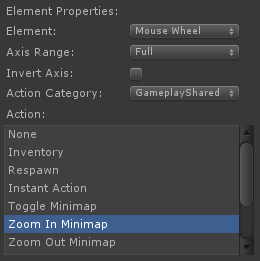
| Element | The controller element. |
| Axis Range | What portion of the axis's range triggers the assigned action? Full = Both positive and negative sides of the axis trigger the action. |
| Invert Axis | Invert the axis? (Only shown if Axis Range is Full) |
| Axis Contribution | When this element is activated, does it add positive or negative value to the action's final axis value? (Only shown if Axis Range is Positive or Negative) |
| Action Category | The category containing the action to be assigned to this element. |
| Action | The action assigned to this element. |
Element Properties (Button):
| Element | The controller element. |
| Axis Contribution | When this element is activated, does it add positive or negative value to the action's final axis value? |
| Action Category | The category containing the action to be assigned to this element. |
| Action | The action assigned to this element. |
Custom Controller Maps
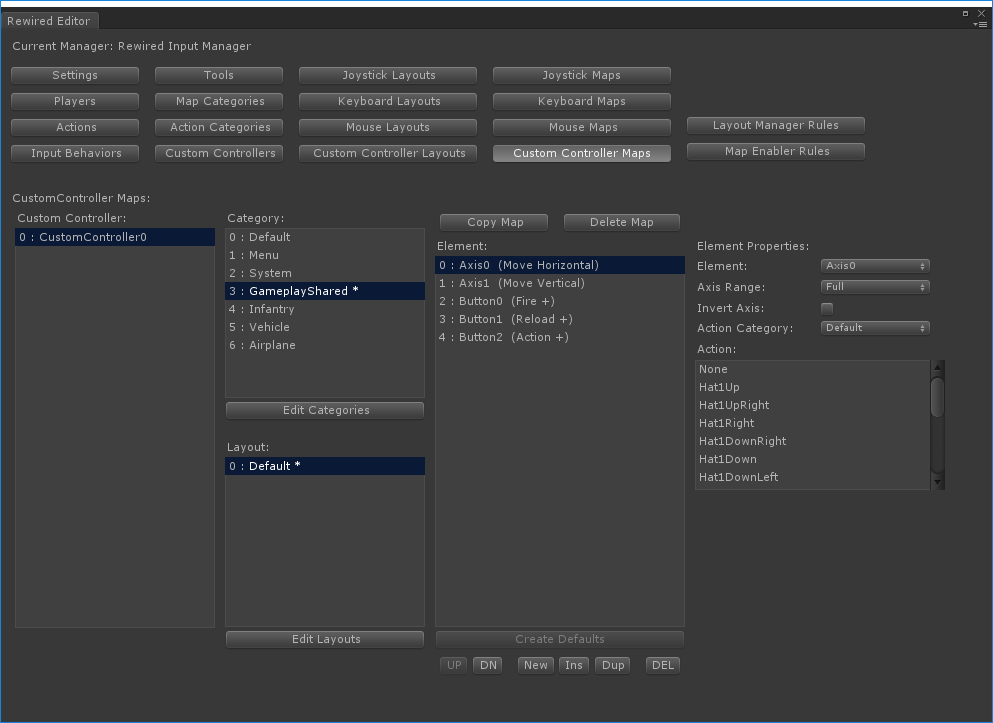
The Custom Controller Maps page allows you to create and edit Custom Controller Maps. Controller Maps must be assigned to Players or they will have no effect. See the Players page for more information.
See Controller Maps for more information.
Selecting a Map:
To select a map, you must select the following: 1) A Custom Controller, 2) a Category, and 3) a Layout.
Creating a new Map:
Select a Custom Controller, a category, and a layout, then click the "Create Map" button. A blank map will be created. You can then add elements to the new map by clicking the "New" button beneath the "Elements" box or by clicking the "Create Defaults" button in the same location. "Create Defaults" will create a series of unassigned elements based on the current Custom Controller. You can then assign actions to these elements. Note: "Create Defaults" is only enabled if the map is empty of elements.
When a Custom Controller, Category, or Layout has had a map created for it, the name will be displayed with an (*) after it.
Deleting a Map:
Select a Custom Controller, a category, and a layout, then click the "Delete Map" button.
Element Properties (Axis):
| Element | The controller element. |
| Axis Range | What portion of the axis's range triggers the assigned action? Full = Both positive and negative sides of the axis trigger the action. |
| Invert Axis | Invert the axis? (Only shown if Axis Range is Full) |
| Axis Contribution | When this element is activated, does it add positive or negative value to the action's final axis value? (Only shown if Axis Range is Positive or Negative) |
| Action Category | The category containing the action to be assigned to this element. |
| Action | The action assigned to this element. |
Element Properties (Button):
| Element | The controller element. |
| Axis Contribution | When this element is activated, does it add positive or negative value to the action's final axis value? |
| Action Category | The category containing the action to be assigned to this element. |
| Action | The action assigned to this element. |
Layout Manager Rules
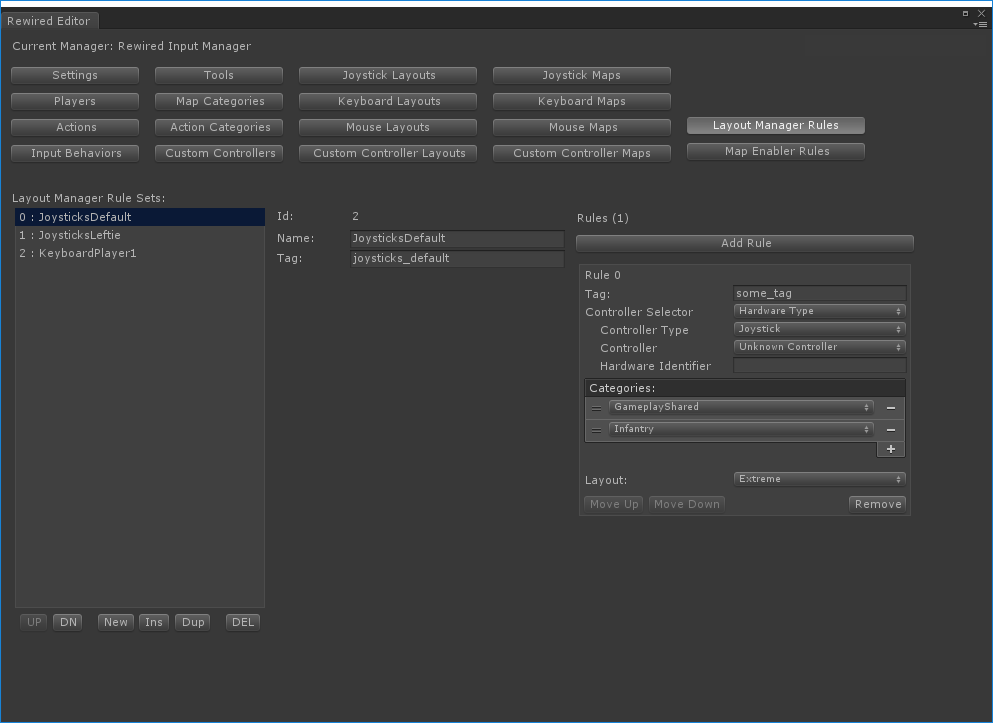
The Layout Manager Rules page allows you to create and edit Layout Manager Rule Sets and Rules. Rule Sets must be assigned to Players or they will have no effect. See the Players page for more information.
See Layout Manager for more information.
Note:
Layout Manager Rule Sets Box:
Select a Rule Set to modify its properties.
Rule Set Properties:
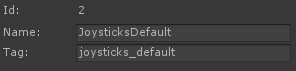
| Id | The id of the Rule Set. This can be used in scripting. |
| Name | The name of the set. Must be unique. |
| Tag | Allows you to search for sets by tag in scripting. |
Rules:
This is the list of Rules in the Rule Set. Add new rules by clicking the "Add Rule" button.
Rule Options:
Set the properties on the Rule to determine what effect it has.
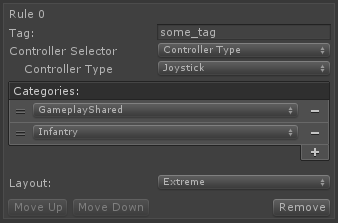
| Tag | A tag which can be used to find an rule in the list. This is optional. |
| Controller Selector | Determines selection method used to find the devices the entry applies to. Available options:
|
| Controller Type | The Controller Type the entry applies to. |
| Controller Template | The Controller Template type this entry applies to. This is only displayed if Controller Selector is set to Controller Template Type. |
| Controller | The hardware type of the Controller this entry applies to. This targets all Controllers that match a specific recognized hardware type such as all Xbox 360 controllers. This is only displayed if Controller Selector is set to Hardware Type. |
| Hardware Identifier | The hardware identifier of the Controller this entry applies to.This targets all Controllers that match a specific unrecognized hardware type such as for a Joystick that has no controller definition built into Rewired. This value can be obtained from Controller.hardwareIdentifier at runtime. If Controller is set to Unknown Controller and this value is blank, it will match all Unknown Controllers. This is only displayed if Controller Selector is set to Hardware Type. |
| Categories | The Map Categories of the Controller Maps the rule applies to. |
| Layout | The Layout of the Controller Maps the rule applies to. |
Map Enabler Rules
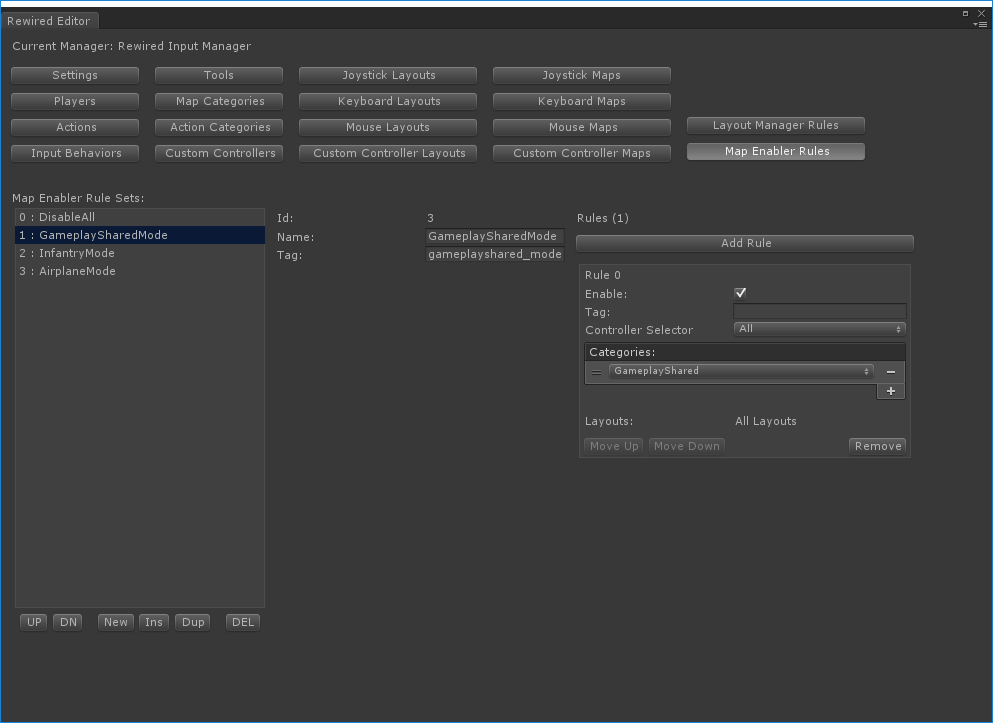
The Map Enabler Rules page allows you to create and edit Map Enabler Rule Sets and Rules. Rule Sets must be assigned to Players or they will have no effect. See the Players page for more information.
See Map Enabler for more information.
Map Enabler Rule Sets Box:
Select a Rule Set to modify its properties.
Rule Set Properties:
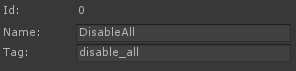
| Id | The id of the Rule Set. This can be used in scripting. |
| Name | The name of the set. Must be unique. |
| Tag | Allows you to search for sets by tag in scripting. |
Rules:
This is the list of Rules in the Rule Set. Add new rules by clicking the "Add Rule" button.
Rule Options:
Set the properties on the Rule to determine what effect it has.
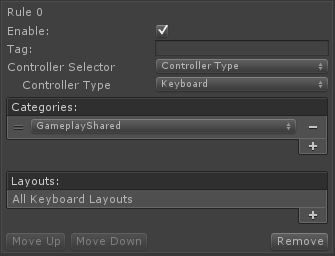
| Tag | A tag which can be used to find an rule in the list. This is optional. |
| Controller Selector | Determines selection method used to find the devices the entry applies to. Available options:
|
| Controller Type | The Controller Type the entry applies to. |
| Controller Template | The Controller Template type this entry applies to. This is only displayed if Controller Selector is set to Controller Template Type. |
| Controller | The hardware type of the Controller this entry applies to. This targets all Controllers that match a specific recognized hardware type such as all Xbox 360 controllers. This is only displayed if Controller Selector is set to Hardware Type. |
| Hardware Identifier | The hardware identifier of the Controller this entry applies to.This targets all Controllers that match a specific unrecognized hardware type such as for a Joystick that has no controller definition built into Rewired. This value can be obtained from Controller.hardwareIdentifier at runtime. If Controller is set to Unknown Controller and this value is blank, it will match all Unknown Controllers. This is only displayed if Controller Selector is set to Hardware Type. |
| Categories | The Map Categories of the Controller Maps the rule applies to. If this is empty, this will apply to all Controller Maps regardless of the Map Category. |
| Layouts | The Layouts of the Controller Maps the rule applies to. If this is empty, this will apply to all Controller Maps regardless of the Layout. |