Integration with Other Packages
Packages:
- Behavior Designer
- Bolt
- Cinemachine 2
- Cinemachine 3
- Corgi Engine - 2D + 2.5D Platformer
- Deftly: Top Down Shooter Framework
- Dialogue System for Unity
- First Person Controller
- GAC (Great Animation Combos) System
- Horse Animset Pro
- Inventory Pro
- iRDS - Intelligent Race Driver System
- Motion Controller
- ORK Framework - RPG Engine
- Platformer Pro
- PlayMaker
- Quest Machine
- Quest System Pro
- Racing Game Starter Kit
- Realistic FPS Prefab
- Realistic Tank Controller
- Rex Engine: A 2D Platformer Engine
- Rucksack - Multiplayer Inventory System
- Sci-Fi Ship Controller
- Space Combat Kit
- Third Person Controller
- UFPM: Ultimate First Person Melee
- UFPS 1.x
- UFPS: Ultimate First Person Shooter
- uFS - Flight Simulation Engine
- Ultimate Character Controller
- Unity UI
- Universal Fighting Engine (UFE)
- Universal Fighting Engine 2 (UFE2)
- uSim Air Module
- UTPM: Ultimate Third Person Melee
- UTPS: Ultimate Third Person Shooter
- Others
Behavior Designer
![]() Rewired can be used with Behavior Designer by Opsive, a popular visual scripting and behavior tree tool for Unity.
Rewired can be used with Behavior Designer by Opsive, a popular visual scripting and behavior tree tool for Unity.
To install the Behavior Designer Integration Pack, do the following:
- Install Rewired and Behavior Designer first. If Behavior Designer is not installed, you will get errors when the integration pack is installed.
- Run the following menu item in the Unity editor:
Window -> Rewired -> Integration -> Behavior Designer -> Install Integration Pack - Follow the on-screen prompts.
To Uninstall:
- Delete the Rewired/Integration/BehaviorDesigner folder
Documentation:
There is no Behavior Designer-specific documentation. Behaviour Designer Tasks are direct analogues to the methods, properties, fields, and events in the Rewired API. All the standard Rewired documentation applies.
Bolt
Bolt by Ludiq brings complete visual scripting to Unity, empowering artists, designers and programmers to create gameplay mechanics and interactive systems without writing a single line of code.
Requirements:
- Bolt 1.4.0f11. (No future version compatibility is guaranteed due to frequent breaking changes in Bolt.)
- Unity 2017.4.13f1+
To install the Bolt Integration Pack, do the following:
- Install Bolt first. If Bolt is not installed, you will get errors when the integration pack is installed.
- Run the following menu item in the Unity editor:
Window -> Rewired -> Integration -> Bolt -> Install Integration Pack - Follow the on-screen prompts.
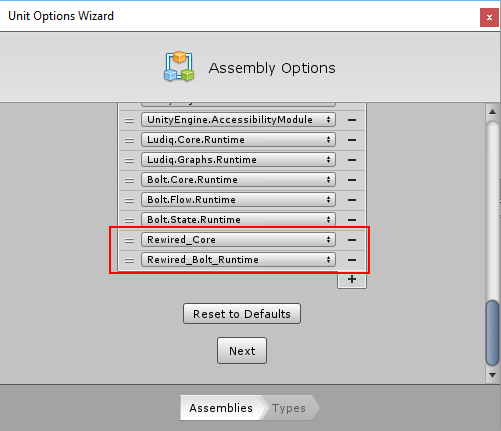
- Add the Rewired_Core and Rewired_Bolt_Runtime libraries to Bolt Assembly Options by running the Unit Options Wizard from the menu:
Tools -> Bolt -> Unit Options Wizard
- Next, add the Rewired classes you intend to use in the Type Options dialog. Any Rewired class you want to access through Bolt must be added here or it will not be available.
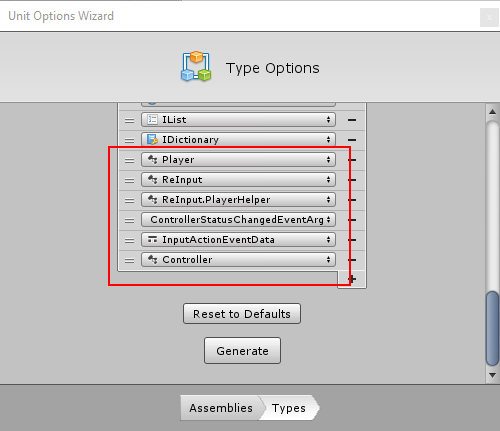
- It is recommended that you add at least the following types:
- Rewired.ReInput
- Rewired.ReInput.PlayerHelper
- Rewired.Player
- Rewired.InputActionEventData
To Uninstall:
- Remove the Rewired assemblies and types from the Bolt Unit Options Wizard.
- Delete the Rewired/Integration/Bolt folder.
Usage:
The Bolt integration pack includes Units for events which can be found in the Bolt Unit inspector under Events/Input/Rewired. All other Rewired members must be added manually (see Step 5 above) and can be accessed through the Bolt Unit inspector under Codebase/Rewired after being added.
Examples:
Two very simple examples showing polling for input and using input events are included in the Rewired/Integration/Bolt/Examples/Scenes folder.
Documentation:
There is no Bolt-specific documentation. Bolt Units are direct analogues to the methods, properties, fields, and events in the Rewired API. All the standard Rewired documentation applies.
Cinemachine 2
NOTE: The Cinemachine 2 integration is not compatible with Cinemachine 3. See the Cinemachine 3 integration instructions if you are using Cinemachine 3.
Cinemachine 2 by Unity Technologies is unified procedural camera system for in-game cameras, cinematics and cutscenes, film pre-visualization and virtual cinematography eSports solutions.
To install the Cinemachine Integration Pack, do the following:
- Download and install Cinemachine.
- Run the following menu item in the Unity editor:
Window -> Rewired -> Integration -> Cinemachine 2 -> Install Integration Pack
To Uninstall:
- Delete the Rewired/Integration/Cinemachine folder
Usage:
- Add a RewiredCinemachineBridge component to a GameObject in the scene. If you add it to the Rewired Input Manager GameObject, you can assign Actions easier by using dropdowns instead of typing strings.
- Create Actions for controlling Cinemachine in the Rewired input manager assign them to Controller Maps in Players per standard Rewired practice. By default, the Cinemachine look camera uses two axes: "Mouse X" and "Mouse Y".
- Create Cinemachine Axis to Rewired Action mappings in the Rewired Cinemachine Bridge inspector to map Cinemachine Axis names to Rewired Actions for each Player.
- All axis string names used by Cinemachine must match exactly to Action names you specify in the Rewired Cinemachine Bridge inspector.
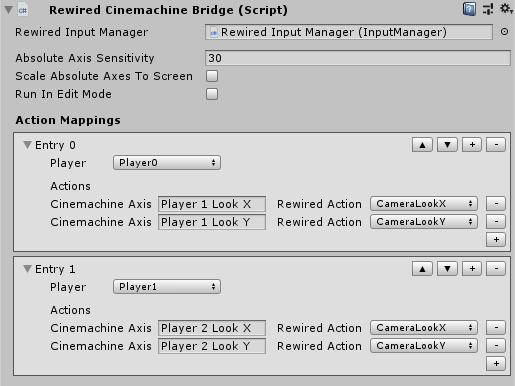
To use multiple Cinemachine cameras with multiple Players:
- Set up the Axis names in the Cinemachine camera inspectors for each Player. Use different strings for each Player. For example: "Player 1 Look X", "Player 1 Look Y" for Player 1, "Player 2 Look X", "Player 2 Look Y" for Player 2, etc.
- Create Axis to Action mappings in the Rewired Cinemachine Bridge for the Axis names you set up in the cameras for each Player.
- See the the image below for an example:
Cinemachine 3
Cinemachine 3 by Unity Technologies is unified procedural camera system for in-game cameras, cinematics and cutscenes, film pre-visualization and virtual cinematography eSports solutions.
Requirements:
- Unity 2022+
- Cinemachine 3
(This integration was built for Cinemachine 3.11. No guarantee of compatibility with past or future versions of Cinemachine is implied.)
To install the Cinemachine 3 Integration Pack, do the following:
- Install Cinemachine 3 from the Package Manager.
- Run the following menu item in the Unity editor:
Window -> Rewired -> Integration -> Cinemachine 3 -> Install Integration Pack
To Uninstall:
- Delete the Rewired/Integration/Cinemachine3 folder
Usage:
- Add a Rewired Cinemachine Input Axis Controller to your Cinemachine Camera from the menu:
Components -> Rewired -> Integrations -> Cinemachine 3 -> Rewired Cinemachine Input Axis Controller - All axis string names used by Cinemachine must match exactly to Action names you specify in the Rewired Cinemachine Bridge inspector.
Advanced Users:
It is possible to use exported Player and Action constants in the Rewired Cinemachine Input Axis Controller inspector so you can select Actions and Players from drop-down lists instead of having to type strings. Two script templates are included which you can copy and edit for this purpose. They are located in the Cinmachine3/Scripts/Templates and Cinemachine3/Scripts/Templates/Editor directories. There is one runtime script file and one editor script. Instructions are included in the scripts. Add the new axis controller component instead of the default one on your Cinemachine Cameras.
Corgi Engine - 2D + 2.5D Platformer
Corgi Engine by More Mountains is a popular 2D + 2.5D platformer template for Unity.
Requirements:
- Corgi Engine v4.0 (No future version compatibility is guaranteed.)
- Unity 5.6.7f1+
To install the Corgi Engine Integration Pack, do the following:
- Install Corgi Engine first before you install Rewired. If you installed Rewired before Corgi Engine, be sure to re-launch the Rewired installer after Corgi Engine finishes installing and allow it to install the Unity input manager entries again because installing Corgi Engine will have replaced Rewired's entries. To re-launch the installer from the menu:
Window -> Rewired -> Setup -> Run Installer - When installing Rewired, install the Touch Controls pack when prompted. If you skipped installation, you can install the Touch Controls from the menu:
Window -> Rewired -> Extras -> Touch Controls -> Install - To install the Corgi Engine integration pack, run the following menu item in the Unity editor:
Window -> Rewired -> Integration -> Corgi Engine -> Install Integration Pack - After the pack is installed, you may need to run the setup script which will set the Script Execution Order on the Corgi Engine input manager script:
Window -> Rewired -> Integration -> Corgi Engine -> Setup -> Run Setup
To Uninstall:
- Delete the Rewired/Integration/CorgiEngine folder
Usage:
Add a Rewired Input Manager to the scene. You can add a pre-configured Rewired Input Manager for Corgi Engine to the scene from the menu:
Window -> Rewired -> Integration -> Corgi Engine -> Create -> Rewired Input Manager
Anywhere where you use the Corgi Engine InputManager component, replace it with the RewiredCorgiEngineInputManager component. You can add the component through the menu:
Component -> Corgi Engine -> Manager -> Rewired Input Manager
Touch Controls:
A default Touch Controller prefab is included in the Rewired/Integration/CorgiEngine/Prefabs folder. You can use this Touch Controller in place of the one that comes with CorgiEngine. To to replace the existing Touch Controller in the demos, you need to add the Touch Controller prefab into the scene underneath the UICamera. Next, find the GUIManager component and replace the references in the fields "Buttons", "Arrows", and "Joystick" with references to the new Touch Controller elements. Specifically hook the main Touch Controller object to the "Buttons" field, then hook the Arrows sub-object to the "Arrows" field, then the Joystick sub-object to the "Joystick" field. These steps are just so you can use the same CorgiEngine InputManager options to display the touch controls and are not mandatory if you'd rather manage their display yourself. You can look at the demo scene Mesa1 located in Rewired/Integration/CorgiEngine/Demos to see the Touch Controls in use. For general information on Rewired's Touch Controls, see the documentation on Touch Controls.
Inventory System:
- The Corgi Engine inventory system uses the Unity UI StandaloneInputModule to control navigation. To change this to use Rewired instead, remove the StandaloneInputModule from the EventSystem in the scene and add a RewiredStandaloneInputModule. See this more information on configuring the RewiredStandaloneInputModule.
- Replace all InventoryInputManager components with the RewiredInventoryInputManager component and copy all relevant inspector values from the old component to the new component.
- Replace all InventoryHotbar components with the RewiredInventoryHotbar component and copy all relevant inspector values from the old component to the new component.
- If the replaced components were referenced by other components, you must re-assign these references using the new components.
Deftly: Top Down Shooter Framework
Deftly: Top Down Shooter Framework by Cleverous aims to deliver flexibility and ease of use into a stable top down shooter environment with AAA quality.
The Rewired integration is included in the package. Please see the Deftly documentation for details.
Note: This integration is a 3rd party integration package and not maintained or supported by Guavaman Enterprises.
Dialogue System for Unity
Dialogue System for Unity by Pixel Crushers makes it easy to add interactive dialogue and quests to your game. It's a complete, robust solution including a visual node-based editor, dialogue UIs, cutscenes, quest logs, save/load, and more.
The Rewired integration is included in the package. Please see the package documentation for details.
Note: This integration is a 3rd party integration package and not maintained or supported by Guavaman Enterprises.
First Person Controller
Rewired can be used with First Person Controller by Opsive, a professional, deterministic character controller designed to have the smoothest first person controls and to excel in all areas: PC, mobile, console, AI, networking, and VR. The integration pack can be downloaded from Opsive's site here.
Note: This integration is a 3rd party integration package and not maintained or supported by Guavaman Enterprises.
GAC (Great Animation Combos) System
GAC (Great Animation Combos) System by Eric Turgott is an asset that allows you to implement combos for any action game. The integration is included in the package. Please see the GAC documentation for details.
Note: This integration is a 3rd party integration package and not maintained or supported by Guavaman Enterprises.
Horse Animset Pro
Horse Animset Pro by Malbers Animation is an animation framework and Riding System controller, root-motion based, for any humanoid character. The integration is included in the package. Please see the Horse Animset Pro documentation for details.
Note: This integration is a 3rd party integration package and not maintained or supported by Guavaman Enterprises.
Inventory Pro
Inventory Pro by Devdog is a highly flexible inventory system for Unity. Inventory Pro can be used for RPG, RTS, FPS, and other game types. The integration is included in the package. Please see the Inventory Pro documentation for details.
Note: This integration is a 3rd party integration package and not maintained or supported by Guavaman Enterprises.
iRDS - Intelligent Race Driver System
iRDS - Intelligent Race Driver System by Jose Garrido is a racing game toolkit that helps you to develop Racing Games. Please see the iRDS documentation for details.
Note: This integration is a 3rd party integration package and not maintained or supported by Guavaman Enterprises.
Motion Controller
Motion Controller by ootii is an animation framework and character controller for any character and any game. You can download the intregration from ootii's Vault. (Search the page for Rewired.)
Note: This integration is a 3rd party integration package and not maintained or supported by Guavaman Enterprises.
ORK Framework - RPG Engine
ORK Framework - RPG Engine by Gaming is Love is a highly flexible system that allows you to create your own role-playing game without any coding.
Rewired can be used with ORK Framework by following braytendo's tutorial here. Or you can use Unity Input Override instead.
Note: This integration is a 3rd party integration package and not maintained or supported by Guavaman Enterprises.
Platformer Pro
Platformer Pro by JNA Mobile is a powerful and flexible kit for making platform games. Please see the Platformer Pro documentation for details.
Note: This integration is a 3rd party integration package and not maintained or supported by Guavaman Enterprises.
PlayMaker
![]() Rewired can be used with PlayMaker by Hutong Games, a popular visual scripting tool for Unity.
Rewired can be used with PlayMaker by Hutong Games, a popular visual scripting tool for Unity.
To install the PlayMaker Integration Pack, do the following:
- Install Rewired and PlayMaker first. If PlayMaker is not installed, you will get errors when the integration pack is installed.
- Run the following menu item in the Unity editor:
Window -> Rewired -> Integration -> PlayMaker -> Install Integration Pack - Follow the on-screen prompts.
To Uninstall:
- Delete the Rewired/Integration/PlayMaker folder
Documentation:
There is no PlayMaker-specific documentation. PlayMaker Actions are direct analogues to the methods, properties, fields, and events in the Rewired API. All the standard Rewired documentation applies.
For example, the Rewired API method:
player.GetButtonDown
Corresponds directly to the PlayMaker Action:
RewiredPlayerGetButtonDown
Quest Machine
Quest Machine by Pixel Crushers is a full-featured, extensible quest system that lets you add procedurally-generated and hand-written quests to your project. The integration is included in the package. Please see the Quest Machine documentation for details.
Note: This integration is a 3rd party integration package and not maintained or supported by Guavaman Enterprises.
Quest System Pro
Quest System Pro by Devdog is an extremely flexible quest, achievement and dialogue / conversation trees system. The integration is included in the package. Please see the Quest System Pro documentation for details.
Note: This integration is a 3rd party integration package and not maintained or supported by Guavaman Enterprises.
Racing Game Starter Kit
Racing Game Starter Kit by Intense Games is an easy to use asset for creating racing games. The integration is included in the package. Please see the Racing Game Starter Kit documentation for details.
Note: This integration is a 3rd party integration package and not maintained or supported by Guavaman Enterprises.
Realistic FPS Prefab
Realistic FPS Prefab by Azuline Studios is a first-person shooter complete project.
This forum post by longroadhwy shows how to do the integration by modifying a bit of source code.
Note: This integration is a 3rd party integration and not maintained or supported by Guavaman Enterprises.
Realistic Tank Controller
Realistic Tank Controller by Bonecracker Games allows you to build highly customizable battle tanks for your project.
The Rewired integration is included in the package. Please see the package documentation for details.
Note: This integration is a 3rd party integration package and not maintained or supported by Guavaman Enterprises.
Rex Engine: A 2D Platformer Engine
Rex Engine: A 2D Platformer Engine is a 2D platformer engine by Sky Tyroannosaur with a huge suite of features designed to save you time and help you create amazing 2D games.
Requirements:
- Rex Engine 1.38 (No future version compatibility is guaranteed.)
- Unity 5.6.5f1+
To install the Rex Engine Integration Pack, do the following:
- Install Rex Engine first before you install Rewired. If you installed Rewired before Rex Engine, be sure to re-launch the Rewired installer after Rex Engine finishes installing and allow it to install the Unity input manager entries again because installing Rex Engine will have replaced Rewired's entries. To re-launch the installer from the menu:
Window -> Rewired -> Setup -> Run Installer - When installing Rewired, install the Touch Controls pack when prompted. If you skipped installation, you can install the Touch Controls from the menu:
Window -> Rewired -> Extras -> Touch Controls -> Install - To install the Rex Engine integration pack, run the following menu item in the Unity editor:
Window -> Rewired -> Integration -> Rex Engine -> Install Integration Pack
To Uninstall:
- Delete the Rewired/Integration/RexEngine folder
Usage:
Add a pre-configured Rewired Input Manager for Rex Engine to the scene from the menu:
Window -> Rewired -> Integration -> Rex Engine -> Create -> Rewired Input Manager
Rucksack - Multiplayer Inventory System
Rucksack - Multiplayer Inventory System by Devdog enables you to easily setup player inventories, NPC inventories, banks, premium shops and much more in offline and online multiplayer games!
The Rewired integration is included in the package. Please see the package documentation for details.
Note: This integration is a 3rd party integration package and not maintained or supported by Guavaman Enterprises.
Sci-Fi Ship Controller
Rewired can be used with Sci-Fi Ship Controller by SCSMMedia which allows you to easily turn your ship models into fully-functioning flying spacecraft..
The Rewired integration is included in the package. Please see the package documentation for details.
Note: This integration is a 3rd party integration package and not maintained or supported by Guavaman Enterprises.
Space Combat Kit
Rewired can be used with Space Combat Kit by VSX Games, designed to help you create anything from a simple arcade space shooter to a sophisticated space sim.
The Rewired integration is included in the package. Please see the package documentation for details.
Note: This integration is a 3rd party integration package and not maintained or supported by Guavaman Enterprises.
Third Person Controller
Rewired can be used with Third Person Controller by Opsive, a professional, deterministic character controller designed to have the smoothest third person controls and to excel in all areas: PC, mobile, console, AI, networking, and VR. The integration pack can be downloaded from Opsive's site here.
Note: This integration is a 3rd party integration package and not maintained or supported by Guavaman Enterprises.
UFPM: Ultimate First Person Melee
Rewired can be used with UFPM: Ultimate First Person Melee by Opsive, It is a professional, deterministic character controller designed to include the smoothest first person controls and to excel in all areas: PC, mobile, console, AI, networking, and VR. The integration pack can be downloaded from Opsive's site here.
Note: This integration is a 3rd party integration package and not maintained or supported by Guavaman Enterprises.
 UFPS 1.x
Rewired can be used to provide input for UFPS by Opsive, a popular first person shooter kit. Rewired comes pre-packaged with an integration kit that was designed to work with UFPS 1.4.9.
The UFPS integration was designed for UFPS 1.x and is not compatible with UFPS 2.x. For UFPS 2.x, see UFPS: Ultimate First Person Shooter.
To install the UFPS Integration Pack, do the following:
- Ensure that you are running Unity 4.5 or greater.
- Install Rewired and UFPS first. If UFPS is not installed, you will get errors when the integration pack is installed.
- Run the following menu item in the Unity editor:
Window -> Rewired -> Integration -> UFPS -> Install Integration Pack - Follow the on-screen prompts.
- When installation is complete, you will need to create a Rewired UFPS Input Manager in your scene before Rewired will be able to handle input. You can do this from the menu:
Window -> Rewired -> Integration -> UFPS -> Create UFPS Rewired Input Manager - The Rewired UFPS Input Manager contains default settings for all of UFPS's controls for the keyboard, mouse, and dual analog gamepads. If you want to customize the controls, simply click the "Rewired UFPS Input Manager" then edit the settings in the Rewired Editor.
To Uninstall:
- Delete the Rewired/Integration/UFPS folder
- Delete the Rewired UFPS Input Manager from the scene
Notes:
- UFPS's built-in input manager will no longer have any effect as long as the Rewired UFPS Input Manager exists in the scene. Additionally, some UFPS functions such as those designed to let you remap keys will no longer have any effect. You should manage key remapping using Rewired instead.
- The Rewired UFPS integration pack makes no changes to the UFPS source code. You are therefore free to update UFPS as you see fit without losing the integration with Rewired.
- If you install UFPS after installing Rewired, UFPS will overwrite the /ProjectSettings/InputManager.asset in your project. This will overwrite Unity input manager entries that Rewired needs to be able to get mouse input or to get joystick input on platforms that fall back on Unity input as the input source. If this happens, simply reinstall Rewired's Input Manager settings by running the installer from the menu Window -> Rewired -> Setup -> Run Installer and allow it to add the necessary entries in the InputManager.asset file.
FAQ:
The fire button (gamepad right trigger) and right stick look do not work unless I click the mouse button in the main window first. This happens in both the editor and game build. How do I fix this?
This issue is not with Rewired, but rather it is an intentional functionality of UFPS.
The Rewired integration only goes so far as to change the input sources for the Actions requested by the various UFPS scripts by replacing the underlying input manager. It doesn't alter the functionality or code of UFPS in any way so it cannot modify this behavior because the Action processing is blocked in the UFPS character script.
UFPS is in control of the mouse pointer control. It doesn't allow you to fire or move the right stick (mouse look) unless the mouse pointer is captured regardless of the platform. There is an inspector option on the UFPS character controller (VP_FPInput -> Mouse Cursor -> Blocks Mouselook) that changes the mouse capture behavior for the right stick, however this doesn't solve the issue with firing.
The only way to "fix" the issue with the fire button (right trigger) is to change UFPS source code. In VP_FPInput.cs, search for the function called InputAttack and find the two lines that read.
if (!vp_Utility.LockCursor) // <-- Comment out this line
  return; // <-- Comment out this line
Note that I cannot provide support on how to use UFPS. This information was only added here because I receive support requests on this issue on a regular basis. If you have issues with UFPS, you should contact the developer, Opsive for support.
I get warnings in the console saying the Actions "LeftTrigger" and "RightTrigger" are missing the first time I press the gamepad triggers in every game session. How do I fix this?
This occurs because the developer of UFPS added LeftTrigger and RightTrigger Actions to UFPS recently when they added joystick support. They were not added to the default UFPS Rewired Input Manager because they were only added to UFPS as a way to convert analog gamepad trigger axis values to button values, but Rewired handles this already using the default Attack action. Adding the Actions would just add confusion since they would be unused and only added to silence those warnings. The warnings are harmless and only show up the first time you press the triggers. If you really want to get rid of the warnings, add two Actions called LeftTrigger and RightTrigger.
UFPS: Ultimate First Person Shooter
Rewired can be used with UFPS: Ultimate First Person Shooter by Opsive, It is a professional, deterministic character controller designed to include the smoothest first person controls and to excel in all areas: PC, mobile, console, AI, networking, and VR. The integration pack can be downloaded from Opsive's site here.
Note: This integration is a 3rd party integration package and not maintained or supported by Guavaman Enterprises.
uFS - Flight Simulation Engine
uFS - Flight Simulation Engine by REMEX Software Ltd delivers previously unseen Flight Simulation accuracy to the Unity Asset Store.
Rewired includes an integration pack for uFS which can be installed from the menu:
Rewired -> Integration -> uFS -> Install Integration Pack
In addition to the integration pack, Unity Input Override must be installed.
Usage
Create a Rewired UnityFS Input Manager from the menu:
Rewired -> Integration -> uFS -> Create uFS Rewired Input Manager
This will set up default controls that will work with uFS.
To Uninstall
- Delete the Rewired/Integration/UFS folder.
- Optionally uninstall Unity Input Override.
Ultimate Character Controller
Rewired can be used with Ultimate Character Controller by Opsive, is a professional, deterministic character controller designed to include the smoothest first and third person controls and to excel in all areas: PC, mobile, console, AI, networking, and VR. The integration pack can be downloaded from Opsive's site here.
Note: This integration is a 3rd party integration package and not maintained or supported by Guavaman Enterprises.
Unity UI
Rewired can be used as the input source for Unity's UI system introduced in Unity 4.6. In order to use Rewired to control Unity's UI, you must replace the StandaloneInputModule component on the UI EventSystem object with the RewiredStandaloneInputModule. Please see Rewired Standalone Input Module for more information.
Universal Fighting Engine (UFE)
Universal Fighting Engine by Mind Studios is a toolkit designed to help you develop your own 2.5D fighting game, using a highly customizable framework and easy to use visual editors.
NOTE: This integration pack is designed to work with Universal Fighting Engine (1.x) and is not compatible with UFE2. UFE2 is a separate product and not code-compatible with Universal Fighting Engine. Use the UFE2 integration instead if you are using UFE2.
Requirements:
- Universal Fighting Engine 1.8.4 (not compatible with UFE2) (No future version compatibility is guaranteed.)
- Unity 2017.2.0f3+
To install the Universal Fighting Engine Integration Pack, do the following:
- Install Universal Fighting Engine first before you install Rewired. If you installed Rewired before Universal Fighting Engine, be sure to re-launch the Rewired installer after Universal Fighting Engine finishes installing and allow it to install the Unity input manager entries again because installing Universal Fighting Engine will have replaced Rewired's entries. To re-launch the installer from the menu:
Window -> Rewired -> Setup -> Run Installer - Install Control Mapper from the menu:
Window -> Rewired -> Extras -> Control Mapper -> Install (Standard)
- To install the integration pack, run the following menu item in the Unity editor:
Window -> Rewired -> Integration -> Universal Fighting Engine -> Install Integration Pack
To Uninstall:
- Delete the Rewired/Integration/UniversalFightingEngine folder
Usage:
- In the UFE Global Editor –> Input Options:
- Set “Input Manager” to “Rewired”
- Change the names of all inputs for both players to:
- For the horizontal axis: “Horizontal”
- For the vertical axis: “Vertical”
For each numbered button: “Button1”, “Button2”, “Button3”, “Button4”, “Button5”, “Button6” - For the Start button: “Start”
- Be sure to remove the "p1" / "p2" prefix from the input names as Rewired does not use this. Both Player 1 and Player 2's input names should be identical.
- Add a pre-configured Rewired Input Manager for Universal Fighting Engine to the scene from the menu:
Window -> Rewired -> Integration -> Universal Fighting Engine -> Create -> Rewired Input Manager
Customizing Action Names:
You can change the display names or the actual scripting names of the Actions in the Rewired Input Manager, but if you change the scripting names, make sure you change them in the UFE global configuration to match.
Touch Controls:
The integration comes with pre-built touch-screen controls. You can set which platforms and under what circumstances the touch controls will be shown by setting the options on the Rewired UFE Input Manager inspector. For more information on customizing the touch controls, see the Touch Controls documentation.
To test touch controls (using the mouse) in the editor, you can enable them in the editor by going to the Rewired UFE Input Manager and in the inspector under Rewired UFE Input Manager, check the box “Editor” under “Show Touch Controls On” and unplug any joysticks or disable the option “Hide Touch Controls When Joysticks Connected.”
In-Game Control Remapping:
To remap controls, go to the Options page in UFE and select “Change Controls”. When you press “Done” the configuration will be saved to XML and will be used the next time you use that controller on that Player. To clear the XML data if you want to make changes in the Rewired Input Manager, clear Player Prefs using the debug options foldout on the UserDataStore_PlayerPrefs component on the Rewired Input Manager.
Important:
This integration requires the Standard version of Control Mapper to be installed. It is not compatible with the Text Mesh Pro version of Control Mapper.
Universal Fighting Engine 2 (UFE2)
Universal Fighting Engine 2 by Mind Studios is a toolkit designed to help you develop your own 2.5D fighting game, using a highly customizable framework and easy to use visual editors.
NOTE: This integration pack is designed to work with Universal Fighting Engine 2 and is not compatible with Universal Fighting Engine 1.x. UFE2 is a separate product and not code-compatible with Universal Fighting Engine (1.x). Use the Universal Fighting Engine integration instead if you are using Universal Fighting Engine 1.x.
Requirements:
- Universal Fighting Engine 2.4.1 (not compatible with Universal Fighting Engine 1.x) No future version compatibility is guaranteed.
To install the Universal Fighting Engine 2 Integration Pack, do the following:
- Install Universal Fighting Engine 2 first before you install Rewired. If you installed Rewired before Universal Fighting Engine 2, be sure to re-launch the Rewired installer after Universal Fighting Engine 2 finishes installing and allow it to install the Unity input manager entries again because installing Universal Fighting Engine 2 will have replaced Rewired's entries. To re-launch the installer from the menu:
Window -> Rewired -> Setup -> Run Installer - Install Control Mapper from the menu:
Window -> Rewired -> Extras -> Control Mapper -> Install (Standard)
- To install the integration pack, run the following menu item in the Unity editor:
Window -> Rewired -> Integration -> Universal Fighting Engine 2 -> Install Integration Pack
To Uninstall:
- Delete the Rewired/Integration/UniversalFightingEngine2 folder
Usage:
- In the UFE Global Editor –> Input Options:
- Set “Input Manager” to “Rewired”
- Change the names of all inputs for both players to:
- For the horizontal axis: “Horizontal”
- For the vertical axis: “Vertical”
For each numbered button: “Button1”, “Button2”, “Button3”, “Button4”, “Button5”, “Button6” - For the Start button: “Start”
- Be sure to remove the "p1" / "p2" prefix from the input names as Rewired does not use this. Both Player 1 and Player 2's input names should be identical.
- Add a pre-configured Rewired Input Manager for Universal Fighting Engine to the scene from the menu:
Window -> Rewired -> Integration -> Universal Fighting Engine 2 -> Create -> Rewired Input Manager
Customizing Action Names:
You can change the display names or the actual scripting names of the Actions in the Rewired Input Manager, but if you change the scripting names, make sure you change them in the UFE global configuration to match.
Touch Controls:
The integration comes with pre-built touch-screen controls. You can set which platforms and under what circumstances the touch controls will be shown by setting the options on the Rewired UFE Input Manager inspector. For more information on customizing the touch controls, see the Touch Controls documentation.
To test touch controls (using the mouse) in the editor, you can enable them in the editor by going to the Rewired UFE Input Manager and in the inspector under Rewired UFE Input Manager, check the box “Editor” under “Show Touch Controls On” and unplug any joysticks or disable the option “Hide Touch Controls When Joysticks Connected.”
In-Game Control Remapping:
To remap controls, go to the Options page in UFE and select “Change Controls”. When you press “Done” the configuration will be saved to XML and will be used the next time you use that controller on that Player. To clear the XML data if you want to make changes in the Rewired Input Manager, clear Player Prefs using the debug options foldout on the UserDataStore_PlayerPrefs component on the Rewired Input Manager.
Important:
This integration requires the Standard version of Control Mapper to be installed. It is not compatible with the Text Mesh Pro version of Control Mapper.
uSim Air Module
uSim Air Module by Softdimension Games helps you build flight models for any aircraft. Smooth and realistic results.
The Rewired integration is included in the package. Please see the package documentation for details.
Note: This integration is a 3rd party integration package and not maintained or supported by Guavaman Enterprises.
UTPM: Ultimate Third Person Melee
Rewired can be used with UTPM: Ultimate Third Person Melee by Opsive, It is a professional, deterministic character controller designed to include the smoothest first person controls and to excel in all areas: PC, mobile, console, AI, networking, and VR. The integration pack can be downloaded from Opsive's site here.
Note: This integration is a 3rd party integration package and not maintained or supported by Guavaman Enterprises.
UTPS: Ultimate Third Person Shooter
Rewired can be used with UTPS: Ultimate Third Person Shooter by Opsive, It is a professional, deterministic character controller designed to include the smoothest first person controls and to excel in all areas: PC, mobile, console, AI, networking, and VR. The integration pack can be downloaded from Opsive's site here.
Note: This integration is a 3rd party integration package and not maintained or supported by Guavaman Enterprises.
Others
Most Unity Asset Store assets can be used with Rewired by using the Unity Input Override system. Please see Unity Input Override for details.